Do you ever feel like you have too much candy around the house after Halloween? Do you have to remove certain candies from your child’s stash because of food allergies?
Last year I started a new tradition at my house. You know the Charlie Brown story “The Great Pumpkin?” Do you remember how Linus told the story about the Great Pumpkin coming to give all the faithful boys and girls gifts? Last year I elaborated on that story a bit. I told my boys that if we put out a nice sign letting the “Great Pumpkin” know that we believe and that we welcome him, he will come and trade their candy for a toy. This solves two things for me. 1. most of the candy is gone. 2. I don't have to replace candy my boys can't have because of food allergies (I have to replace something like 90% of the candy they get Trick-or-Treating).
Just before Halloween, I found this pumpkin decoration. I also purchased a small rectangular piece of wood that I painted up and put rub on letters to make a sign to welcome the great pumpkin. I Drilled a couple of holes in my welcome sign and into the bottom of my pumpkin. The night of Halloween we put this sign on our front door letting the “Great Pumpkin” know he is welcome. Why the night before? Because I have another Halloween decoration that also hangs on our door. ;)
I know, I know….my boys are a bit spoiled. ;) The toys they got were Bakugans. The “Great Pumpkin” left them with about 10 pieces each of candy they could eat. They still kept a little candy and were totally thrilled with the exchange.
Oh and by the way, I got my idea from Anjeanette. She was talking about the idea a couple of years ago. I have to give credit where credit is due.
Katrina
Showing posts with label Katrina. Show all posts
Showing posts with label Katrina. Show all posts
Monday, October 25, 2010


Thursday, June 10, 2010
Lego Indiana Jones Birthday Party
OK here is where you start humming the theme song. Cause that is totally what is going through my head right now. ;) So go ahead and take care of that little sound clip for me. ;)
Now that we have the background music taken care of lets get on to party stuff. I did a lot of searching on ye old’ web for ideas. Boy! Did I ever find lots and lots of really cool ideas out there. Some how with all that coolness I managed to put my own twist on things. Seriously you hardly even have to do any of your own planning with how many cool parties there are out there with this theme. I really did want to do each and every single idea and then reality set in. There is no way that I could cram it all into one party. Not even if that party lasted 8 hours. Plus with my boys our parties can’t be too fussy. They don’t do well when we try to micro mange the party. All the transitions from one game or thing to the next causes them to be upset.

Google is a great place to start when looking for Lego Indiana Jones images. All you really have to do is page through the images and find one you like. Copy it and put it into your trusty photo editor, add a background and type up your invitation. I saved it in a small enough file format to be able to email it to all the kids in my son’s class. (His teacher was awesome! At the beginning of the year she gave everyone a complete phone, address and email list of all the kids in the class. It was complete with parents names. She suggested we all get to know each other since our kids would probably be in the same classes through 8th grade.)
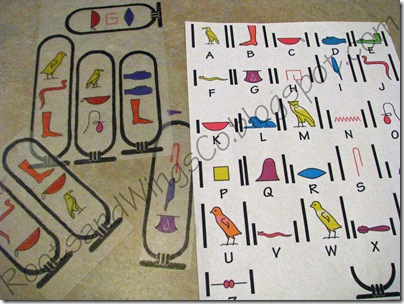
When I throw a party I try to come up with favors that are part of the theme. Often times I will go with something that has a related theme. For example I know that Indiana Jones was an Archeologist. I know that he was some times after Egyptian artifacts. So I went to Google and found this website that allows you to write in Hieroglyphics. Specifically they put it in cartouche format. I made a key by copying the images of each of the alphabet letter. By the way you can’t do them all at once because the program will condense it down. When writing in hieroglyphics apparently it isn’t one symbol per letter at some point. If you are doing 3 initials it is. So get the initials of all the kids and paste them into your trusty photo editor. I actually made up a sheet with all the symbols stacked for each name. I also reversed the image because I painted the side you draw on with gold. That way the front has a shiny surface. To help me remember which was which, I put the initials on the master copy just below each cartouche. The cartouches on the left are my Shrinky Dinks waiting to be cut out and put into the oven. I used permanent markers to trace and color in the images. I found that coloring in the images before tracing the out line was better. When coloring over the black marker it tends to smear.

This one is my son’s initials. I forgot to punch the holes in the top before I put them in the oven. The one on the left is the back side of his brother’s cartouche. As you can see they don’t all turn out the same size. It all depends on the symbols for each letter.
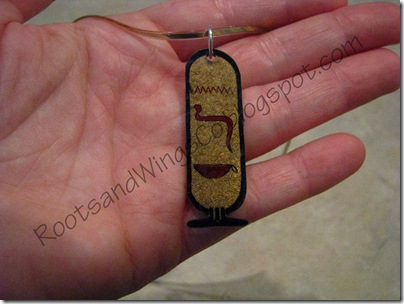
This is one of the finished cartouches for his friends. Since the hole got really small (I used a regular size hole punch), I used a jump ring and put it on some gold boon dongle cord. (I think that is what that stuff is called). I have another observation to share. If you over bake your cartouches a little it gives a slightly crackled look and makes the gold background look more shiny through the cartouche. Also keep some chopsticks or something similar on hand when shrinking these. You may have to open the oven and pry them open. They curl as they shrink and some of them wanted to stick to themselves. This was corrected easily by holding down one side and pulling back with the other chopstick to open it. Then close the oven back up and let them straighten out. I press them down with a flat spatula as soon as I get them out of the oven. This helps to straighten them out a little more. Once they were cool, I painted two coats of acrylic gold metallic paint on the rough side. Once I had the templates made they were pretty quick and easy to trace out.
I had the key (shown in the top picture) out and had each of the kids figure out what the symbols were for their initials. They then had to find the correct cartouche. They loved it. Their parents also thought they were pretty cool too.
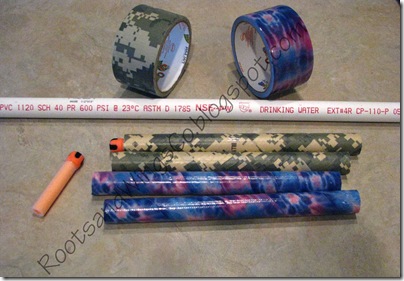
Dig out your memories of Raider’s of the Lost Arch. In the beginning of the movie the Hovitos (sp?) Had poison blow darts that they were chasing Indy with. Many people use straw with q-tips dipped in red paint and shoot them at some sort of picture of one of the villains. I was ready to start working on that idea when I thought of all the extra PVC pipe I had left over from our Lego Agents Party last January (we made marshmallow shooters). I had a few pieces that were 9” long. I decided to take one of our tag darts and see if I could shoot it out of the pipe. YEP, it worked. Please not that not all 1/2 inch PVC pipe have the same inner diameter. Be sure to take a dart with you to the hardware store to make sure it will fit. I had picked up a few 2 foot pre cut pieces that ended up not working because of that problem. So back to buying a 10 foot length of the stuff I bought in January. Luckily we are only talking about $3 worth. If you look closely at the above picture you can see all the info off the pipe I used. I simply wound the duck tape diagonally around the pipe and trimmed the ends. Another idea to help the kids know whose is whose is to label them with their names. I used my trusty label maker for that. It was kind of hard to see the names at a glance. I would have liked to have had colored electrical tape to make colored bands that the labels could be put on. That way the kids can see what color it is as well as their name. Even the location of the tape could be an indicator.

Time to make some targets. I purchased 5/8 of a yard of red felt and 1/2 a yard of black felt. I also had a smaller piece of red felt for the circles. I cut the red felt into 4 equal rectangles for the background. For the silhouettes I printed out an image of Mola Ram on 13x19 inch paper. I happen to have a printer that large but you can print him out in sections if you don’t. I traced the image onto poster board for my template. I found the image on www.bricklink.com and went to the mini figure section and then to the Indiana Jones figures and then clicked on Mola Ram (I did the same for all the other characters). I then copied the image and pasted into my Photo Shop program. I made the canvas size 13x19 inches and enlarged the figure as much as I could to fit the whole space. I simply used my poster board cut out as a patter on the black felt. I used no-sew Heat-N-Bond to adhere the silhouette onto the background and did the same with the target spots.
Note: Use a piece of paper between the felt and the iron otherwise the felt will melt onto the iron if you warn not using cotton wool felt.
If you don't know about www.briklink.com it is a website devoted to buying and selling Legos. New and used. When looking for specific items they have a picture of the item and list all of the shops that have that item in order of price. Anyway, if you are looking for figure images it is a good place to go because all the pictures are front and center with the figures standing up. We have shopped there many times for those hard to find items or for even replacement items.
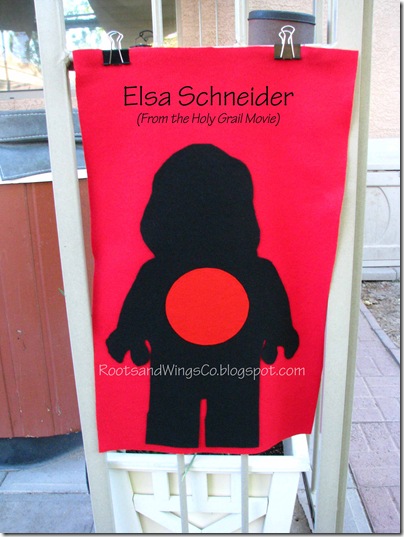
For each of the other figures I simple sized the head to the same proportions. I cropped just the heads from the images and printed them out on standard 8.5x11 inch paper. I cut the head off of my Mola Ram template and taped on the next head. Since all mini figures have the exact same body this works.

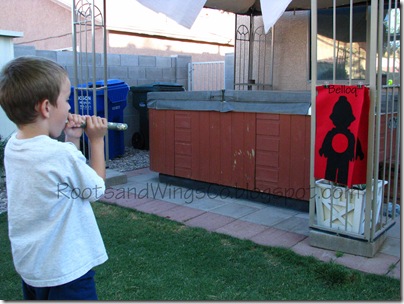
Here is my 6 year old demonstrating how to use these. He is aiming at Belloq. Put the dart in the mouth end of the tube and blow. It does not work so well if you put the dart just inside the other end. It flies straighter and faster if you put it in the mouth end. Our tubes are 9 inches long. We sampled shorter tubes and the darts didn’t fly as far or as straight. I was able to blow the darts out of an 18 inch tube as well. We went with 9 inches because I already had 5 tubes at that length. If you are doing these then buy a 10 foot length and cut it down into 12 inch sections. You will have 10 blow tubes for just over $3. You can use Nerf tag darts that already have the hook side of Velcro on them or you could simply use 3/4 inch pom poms. If you did that then you could probably try making the center circle out of the hook side of velcro for them to stick to. We gave each child a tube and two darts to keep.
The boys got the camouflage “duck” tape and the girls got the tie dye “duck” tape. I purchased the “Duck” tape from my craft store.

I had to do another mini figure cake. I couldn’t do it for one and not the other. You can check out my Lego Agents Party Post for info on the head and hands. For Indiana Jones I used food coloring to add his beard and eye brows. His whip, bag, gun holster and belt are all made of rolled fondant (like the outer layer of the head and hands). I used some napkins inside a plastic bag to help give his bag some shape.
The frosting is regular white frosting from Wilton. However, I did add some chocolate frosting for the pants. So the top half of the cake is chocolate cake with white frosting and the bottom is chocolate on chocolate. I used Betty Crocker’s gluten free cake mix. If you want to make a 9x13 inch cake with that mix you have to use two boxes or you will end up with pancakes.
By the way our guests didn’t know it was gluten free and they were saying how good the cake was.
Note: I noticed that Wilton’s frosting says it may contain dairy. I am not entirely sure but we think my oldest is reacting to possible trace amounts of dairy. That or he is getting his Dad’s cold. My 6 year old currently has the stomach flu with massive stomach cramps so it is hard to tell.
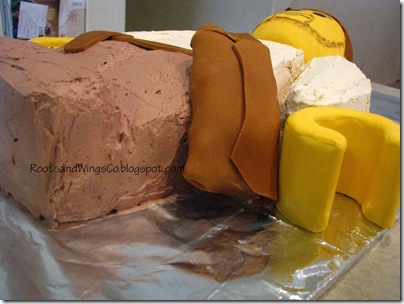
The whip and the bag were made a few days ahead of time so that they could dry out. I added the strap to the bag the day I made the cake. I simply wet one side of the bag so the strap would stick to it.
I used embroidery floss to make the marks in the fondant to make it look braided. For an added touch I tied the floss onto the end and braided it to look like the string on the end of an actual whip. Yep you guessed it I Googled how to braid a whip. I watched a couple of videos on it. It is fascinating to watch. I was going to try to braid the fondant but it likes to dry out quick and cracks when it does. I like how it turned out don’t you?
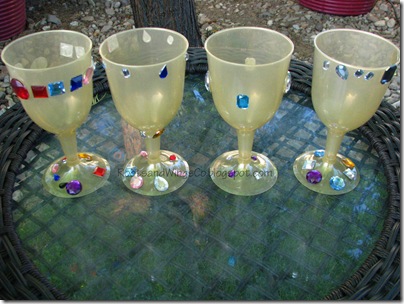
I tried to do a tie in with all of the movies. The kids used sticky dots and gems to make their own “Holy Grail” cups. OK so we all know the real Holy Grail in the movie was as plain as could be but this was more fun for the kids.
My only note about this is that you need a TON of gems. I didn’t have nearly enough. I forgot that 6 and 8 year olds will load up the cups with as many gems as they can get away with. So either have lots and lots and lots and double what you think lots is, of gems or give each child a set amount of gems to work with. I put the gems on the sticky dots ahead of time.

There isn’t a whole lot that I would tie in with the Temple of Doom for 6 year olds but I had to do eyeballs. I had been wanting to make eyeball ice cubes when I found someone that used truffle molds for the shape. I decided to try using their girls marshmallow recipe and it worked great. They were soft and squishy. One mom said that she had to close her eyes before popping one in her mouth. The adults couldn’t resist them. The more adventurous kids also tried them. All in all they were a hit and very yummy. I can see making these every Halloween.
Click here for the recipe and how to make the marshmallows.
To make them into eyeballs you will need:
The recipe from our Marshmallow Post
Truffle molds (like the ones Wilton makes) (I had two molds and they are only $2 a mold so get as many as you need so you can make all your eyeballs at once. Each mold makes 14 truffles.)
Non-stick spray
A Pastry bag (or plastic bag with a corner cut off)
blue food coloring (the liquid type)
Black gel food coloring (for the pupil)
A Paint brush
Once you have made your marshmallow fluff put it into your pastry bag. Spray the truffle mold to give it a good coating (so the marshmallow won’t stick). Then pipe in the marshmallow into each well. Spray some foil completely with the non-stick spray and cover for a few hours so the marshmallow sets up.
I had a pan ready for the extra marshmallow fluff to make regular marshmallows.
Once your marshmallows have set up and can be handled it is time to “paint” them up. They will be slippery at this point with the non-stick spray. I made mine the day before and the slippery feel to them went mostly away. Anyway. Have a plate ready that is dusted with powdered sugar to keep them from sticking.
Carefully pull all the marshmallows out of the mold with the round side up. Put a bit of blue food coloring in the bottom of a small bowl. You will take an eye ball and dip the top of it in the food coloring. It will have quite a bit on it. You can then “paint” the others by dabbing the first eyeball onto some of the others. When it no longer transfers much color put it down and start with another one. Once you have all your iris’ done you can paint the pupil on with a paint brush. I put mine in the fridge over night loosely covered with foil.
In the above picture you can see that I tried to paint one of the eyeballs with blue gel icing and a paint brush. (it is the one on the right almost in the bottom corner) The others turned out so much better and took the coloring easier.
Other things we did for the party:
We also purchased some dates from the grocery store so that anyone who wanted to could try a date. I was tempted to put a sign out that said “Bad Dates” but figured nobody would try them.
I found some big snakes at the dollar store and hung them from our tree and on the swing set in the back yard. I also purchased sever bags of small snakes and put some around the food on the table and most of them in our sand pit area.
The kids took home the items that I had made for them plus gem lollipop rings, a twisty straw and mini packs of their own water balloons.
We had toilet paper on hand that we were going to do a mummy wrapping contest with. We completely forgot about it since we were all having such a good time.
We also had a water balloon fight since it was 104 degrees out side that day. I have to say that unless you plan to fill water balloons ahead of time I would go with those foam water bombs form the dollar store or water guns or they now have tubes that you can get for a dollar. You put then end of the tube in a bucket of water and pull back on the plunger to fill. They are awesome but don’t last very long (so get extras in case one breaks during water play).
We had a massive water fight on Memorial Day weekend with all the cousins. They all got soaked with those water tubes and had a blast for hours. Plus they got to take them home.
Totally unrelated to the IJ party but I have to share this. I found this set of plans on Instructables for making water cannons out of PVC. They would be fun for the kids to put together and then play with and last way longer then the ones I got at the dollar store. The website makes them out of 2 inch and 1 inch PVC but you could easily use 1 inch and 1/2 inch PVC for smaller kids. They would be very cheap to make up using the 1 and 1/2 inch pipe sizes. I can totally see making these for a party. It is a good thing I didn’t see this before the party or I would have had to make them. ;) My darling husband smiles and goes along with all my crazy schemes.
You survived my extremely long post!!
Thanks for hanging in there with me!
Katrina
Now that we have the background music taken care of lets get on to party stuff. I did a lot of searching on ye old’ web for ideas. Boy! Did I ever find lots and lots of really cool ideas out there. Some how with all that coolness I managed to put my own twist on things. Seriously you hardly even have to do any of your own planning with how many cool parties there are out there with this theme. I really did want to do each and every single idea and then reality set in. There is no way that I could cram it all into one party. Not even if that party lasted 8 hours. Plus with my boys our parties can’t be too fussy. They don’t do well when we try to micro mange the party. All the transitions from one game or thing to the next causes them to be upset.

Google is a great place to start when looking for Lego Indiana Jones images. All you really have to do is page through the images and find one you like. Copy it and put it into your trusty photo editor, add a background and type up your invitation. I saved it in a small enough file format to be able to email it to all the kids in my son’s class. (His teacher was awesome! At the beginning of the year she gave everyone a complete phone, address and email list of all the kids in the class. It was complete with parents names. She suggested we all get to know each other since our kids would probably be in the same classes through 8th grade.)

When I throw a party I try to come up with favors that are part of the theme. Often times I will go with something that has a related theme. For example I know that Indiana Jones was an Archeologist. I know that he was some times after Egyptian artifacts. So I went to Google and found this website that allows you to write in Hieroglyphics. Specifically they put it in cartouche format. I made a key by copying the images of each of the alphabet letter. By the way you can’t do them all at once because the program will condense it down. When writing in hieroglyphics apparently it isn’t one symbol per letter at some point. If you are doing 3 initials it is. So get the initials of all the kids and paste them into your trusty photo editor. I actually made up a sheet with all the symbols stacked for each name. I also reversed the image because I painted the side you draw on with gold. That way the front has a shiny surface. To help me remember which was which, I put the initials on the master copy just below each cartouche. The cartouches on the left are my Shrinky Dinks waiting to be cut out and put into the oven. I used permanent markers to trace and color in the images. I found that coloring in the images before tracing the out line was better. When coloring over the black marker it tends to smear.

This one is my son’s initials. I forgot to punch the holes in the top before I put them in the oven. The one on the left is the back side of his brother’s cartouche. As you can see they don’t all turn out the same size. It all depends on the symbols for each letter.

This is one of the finished cartouches for his friends. Since the hole got really small (I used a regular size hole punch), I used a jump ring and put it on some gold boon dongle cord. (I think that is what that stuff is called). I have another observation to share. If you over bake your cartouches a little it gives a slightly crackled look and makes the gold background look more shiny through the cartouche. Also keep some chopsticks or something similar on hand when shrinking these. You may have to open the oven and pry them open. They curl as they shrink and some of them wanted to stick to themselves. This was corrected easily by holding down one side and pulling back with the other chopstick to open it. Then close the oven back up and let them straighten out. I press them down with a flat spatula as soon as I get them out of the oven. This helps to straighten them out a little more. Once they were cool, I painted two coats of acrylic gold metallic paint on the rough side. Once I had the templates made they were pretty quick and easy to trace out.
I had the key (shown in the top picture) out and had each of the kids figure out what the symbols were for their initials. They then had to find the correct cartouche. They loved it. Their parents also thought they were pretty cool too.

Dig out your memories of Raider’s of the Lost Arch. In the beginning of the movie the Hovitos (sp?) Had poison blow darts that they were chasing Indy with. Many people use straw with q-tips dipped in red paint and shoot them at some sort of picture of one of the villains. I was ready to start working on that idea when I thought of all the extra PVC pipe I had left over from our Lego Agents Party last January (we made marshmallow shooters). I had a few pieces that were 9” long. I decided to take one of our tag darts and see if I could shoot it out of the pipe. YEP, it worked. Please not that not all 1/2 inch PVC pipe have the same inner diameter. Be sure to take a dart with you to the hardware store to make sure it will fit. I had picked up a few 2 foot pre cut pieces that ended up not working because of that problem. So back to buying a 10 foot length of the stuff I bought in January. Luckily we are only talking about $3 worth. If you look closely at the above picture you can see all the info off the pipe I used. I simply wound the duck tape diagonally around the pipe and trimmed the ends. Another idea to help the kids know whose is whose is to label them with their names. I used my trusty label maker for that. It was kind of hard to see the names at a glance. I would have liked to have had colored electrical tape to make colored bands that the labels could be put on. That way the kids can see what color it is as well as their name. Even the location of the tape could be an indicator.

Time to make some targets. I purchased 5/8 of a yard of red felt and 1/2 a yard of black felt. I also had a smaller piece of red felt for the circles. I cut the red felt into 4 equal rectangles for the background. For the silhouettes I printed out an image of Mola Ram on 13x19 inch paper. I happen to have a printer that large but you can print him out in sections if you don’t. I traced the image onto poster board for my template. I found the image on www.bricklink.com and went to the mini figure section and then to the Indiana Jones figures and then clicked on Mola Ram (I did the same for all the other characters). I then copied the image and pasted into my Photo Shop program. I made the canvas size 13x19 inches and enlarged the figure as much as I could to fit the whole space. I simply used my poster board cut out as a patter on the black felt. I used no-sew Heat-N-Bond to adhere the silhouette onto the background and did the same with the target spots.
Note: Use a piece of paper between the felt and the iron otherwise the felt will melt onto the iron if you warn not using cotton wool felt.
If you don't know about www.briklink.com it is a website devoted to buying and selling Legos. New and used. When looking for specific items they have a picture of the item and list all of the shops that have that item in order of price. Anyway, if you are looking for figure images it is a good place to go because all the pictures are front and center with the figures standing up. We have shopped there many times for those hard to find items or for even replacement items.

For each of the other figures I simple sized the head to the same proportions. I cropped just the heads from the images and printed them out on standard 8.5x11 inch paper. I cut the head off of my Mola Ram template and taped on the next head. Since all mini figures have the exact same body this works.

Here is my 6 year old demonstrating how to use these. He is aiming at Belloq. Put the dart in the mouth end of the tube and blow. It does not work so well if you put the dart just inside the other end. It flies straighter and faster if you put it in the mouth end. Our tubes are 9 inches long. We sampled shorter tubes and the darts didn’t fly as far or as straight. I was able to blow the darts out of an 18 inch tube as well. We went with 9 inches because I already had 5 tubes at that length. If you are doing these then buy a 10 foot length and cut it down into 12 inch sections. You will have 10 blow tubes for just over $3. You can use Nerf tag darts that already have the hook side of Velcro on them or you could simply use 3/4 inch pom poms. If you did that then you could probably try making the center circle out of the hook side of velcro for them to stick to. We gave each child a tube and two darts to keep.
The boys got the camouflage “duck” tape and the girls got the tie dye “duck” tape. I purchased the “Duck” tape from my craft store.

I had to do another mini figure cake. I couldn’t do it for one and not the other. You can check out my Lego Agents Party Post for info on the head and hands. For Indiana Jones I used food coloring to add his beard and eye brows. His whip, bag, gun holster and belt are all made of rolled fondant (like the outer layer of the head and hands). I used some napkins inside a plastic bag to help give his bag some shape.
The frosting is regular white frosting from Wilton. However, I did add some chocolate frosting for the pants. So the top half of the cake is chocolate cake with white frosting and the bottom is chocolate on chocolate. I used Betty Crocker’s gluten free cake mix. If you want to make a 9x13 inch cake with that mix you have to use two boxes or you will end up with pancakes.
By the way our guests didn’t know it was gluten free and they were saying how good the cake was.
Note: I noticed that Wilton’s frosting says it may contain dairy. I am not entirely sure but we think my oldest is reacting to possible trace amounts of dairy. That or he is getting his Dad’s cold. My 6 year old currently has the stomach flu with massive stomach cramps so it is hard to tell.

The whip and the bag were made a few days ahead of time so that they could dry out. I added the strap to the bag the day I made the cake. I simply wet one side of the bag so the strap would stick to it.
I used embroidery floss to make the marks in the fondant to make it look braided. For an added touch I tied the floss onto the end and braided it to look like the string on the end of an actual whip. Yep you guessed it I Googled how to braid a whip. I watched a couple of videos on it. It is fascinating to watch. I was going to try to braid the fondant but it likes to dry out quick and cracks when it does. I like how it turned out don’t you?

I tried to do a tie in with all of the movies. The kids used sticky dots and gems to make their own “Holy Grail” cups. OK so we all know the real Holy Grail in the movie was as plain as could be but this was more fun for the kids.
My only note about this is that you need a TON of gems. I didn’t have nearly enough. I forgot that 6 and 8 year olds will load up the cups with as many gems as they can get away with. So either have lots and lots and lots and double what you think lots is, of gems or give each child a set amount of gems to work with. I put the gems on the sticky dots ahead of time.

There isn’t a whole lot that I would tie in with the Temple of Doom for 6 year olds but I had to do eyeballs. I had been wanting to make eyeball ice cubes when I found someone that used truffle molds for the shape. I decided to try using their girls marshmallow recipe and it worked great. They were soft and squishy. One mom said that she had to close her eyes before popping one in her mouth. The adults couldn’t resist them. The more adventurous kids also tried them. All in all they were a hit and very yummy. I can see making these every Halloween.
Click here for the recipe and how to make the marshmallows.
To make them into eyeballs you will need:
The recipe from our Marshmallow Post
Truffle molds (like the ones Wilton makes) (I had two molds and they are only $2 a mold so get as many as you need so you can make all your eyeballs at once. Each mold makes 14 truffles.)
Non-stick spray
A Pastry bag (or plastic bag with a corner cut off)
blue food coloring (the liquid type)
Black gel food coloring (for the pupil)
A Paint brush
Once you have made your marshmallow fluff put it into your pastry bag. Spray the truffle mold to give it a good coating (so the marshmallow won’t stick). Then pipe in the marshmallow into each well. Spray some foil completely with the non-stick spray and cover for a few hours so the marshmallow sets up.
I had a pan ready for the extra marshmallow fluff to make regular marshmallows.
Once your marshmallows have set up and can be handled it is time to “paint” them up. They will be slippery at this point with the non-stick spray. I made mine the day before and the slippery feel to them went mostly away. Anyway. Have a plate ready that is dusted with powdered sugar to keep them from sticking.
Carefully pull all the marshmallows out of the mold with the round side up. Put a bit of blue food coloring in the bottom of a small bowl. You will take an eye ball and dip the top of it in the food coloring. It will have quite a bit on it. You can then “paint” the others by dabbing the first eyeball onto some of the others. When it no longer transfers much color put it down and start with another one. Once you have all your iris’ done you can paint the pupil on with a paint brush. I put mine in the fridge over night loosely covered with foil.
In the above picture you can see that I tried to paint one of the eyeballs with blue gel icing and a paint brush. (it is the one on the right almost in the bottom corner) The others turned out so much better and took the coloring easier.
Other things we did for the party:
We also purchased some dates from the grocery store so that anyone who wanted to could try a date. I was tempted to put a sign out that said “Bad Dates” but figured nobody would try them.
I found some big snakes at the dollar store and hung them from our tree and on the swing set in the back yard. I also purchased sever bags of small snakes and put some around the food on the table and most of them in our sand pit area.
The kids took home the items that I had made for them plus gem lollipop rings, a twisty straw and mini packs of their own water balloons.
We had toilet paper on hand that we were going to do a mummy wrapping contest with. We completely forgot about it since we were all having such a good time.
We also had a water balloon fight since it was 104 degrees out side that day. I have to say that unless you plan to fill water balloons ahead of time I would go with those foam water bombs form the dollar store or water guns or they now have tubes that you can get for a dollar. You put then end of the tube in a bucket of water and pull back on the plunger to fill. They are awesome but don’t last very long (so get extras in case one breaks during water play).
We had a massive water fight on Memorial Day weekend with all the cousins. They all got soaked with those water tubes and had a blast for hours. Plus they got to take them home.
Totally unrelated to the IJ party but I have to share this. I found this set of plans on Instructables for making water cannons out of PVC. They would be fun for the kids to put together and then play with and last way longer then the ones I got at the dollar store. The website makes them out of 2 inch and 1 inch PVC but you could easily use 1 inch and 1/2 inch PVC for smaller kids. They would be very cheap to make up using the 1 and 1/2 inch pipe sizes. I can totally see making these for a party. It is a good thing I didn’t see this before the party or I would have had to make them. ;) My darling husband smiles and goes along with all my crazy schemes.
You survived my extremely long post!!
Thanks for hanging in there with me!
Katrina
Technorati Tags: Lego,Indiana Jones,party,marshmallow,eyeballs,food,party favors,cake
We are joining the fun at the following parties; Tatertots and Jello, Funky Junk Interiors, Stephanie Lynn,
We are joining the fun at the following parties; Tatertots and Jello, Funky Junk Interiors, Stephanie Lynn,
Saturday, April 3, 2010
Autism Awareness Month and a Flower-loop-bow

April is Autism Awareness Month and April 2nd was World Autism Awareness Day. I made the above pin to wear in honor of my children. May Arts blog has a wonderful tutorial on how to make flower loop bows using ribbon. They are very easy to make. Instead of just layering ribbon I added a silk flower in the center of mine. I used craft glue to hold the flower in place and added a pin on the back. This would be fun as a hair bow, on a gift, in a frame, in a bouquet, topping a pen or pencil, as a magnet or anything else you can think of to add it to.
Here are a couple of pins from last year. Autism Awareness Felt Broach and a Polymer Clay Autism Awareness pin.
Lately I have taken a step back from blogging because there is a lot going on in my life. Actually there has always been a lot going on in my life this is nothing new. In January we got confirmation that our 5 year old is Autistic. His older brother was diagnosed in 2004. Just a few months after his brother was born. My oldest was diagnosed at 2 1/2 years and my youngest was diagnosed at 5. That is a big age difference. So why did it take so long if we already knew what Autism looked like? Because they were two totally different babies. Though as they have gotten older the similarities are much more apparent. Some of it has to do with the fact that my 5 year old idolizes his brother. He wants to do everything he does. He is also higher functioning in many ways.
I could write a post that goes on and on about what they are like now and what they were like as babies. I could write about the story of how we came to getting their diagnosis’ but I have a feeling that it would be more of a mini book than a blog post.
What I am going to say is this. If you have a child that you feel that there may be something “different” about them. Something that you can’t quite put your finger on. You really need to get them evaluated and the sooner the better. My other bit of advice is that some times Autism might look like typical age appropriate behavior when they are little but the difference is that their issues impede them from being able to do tasks. If you get them evaluated and you are told there isn’t a need for further evaluation but they still think your child needs speech and occupational therapy and qualifies for preschool through early intervention keep your eye open. (This is why my youngest wasn't diagnosed at 3. They thought his issues were learned behaviors.) Better yet if you think they are wrong then talk to your child’s Dr. and get a referral to have your child evaluated by either a Developmental Pediatrician or a child psychologist. Talk to their teacher and be involved. That way you will know if your child is making progress. You will know if they have outgrown what was “typical” behavior at age 3 or not. You can have your child re-evaluated (here it is every year). If the concerns you had for your child at age 3 have not resolved then you need to consider having them re-evaluated. Education is far to important to not get all the support your child needs to be successful in school.
Having your child evaluated does not hurt them and it isn’t invasive. In fact they think they are playing. What can hurt your child is not having them evaluated when you suspect something isn’t right. Early intervention is crucial to their development. Think of it this way, you can help train their brain while it is still growing and before they get set in their ways.
Some resources are http://www.autismspeaks.org/ and http://www.autism-society.org/site/PageServer There may also be a local chapter of the Autism Society in your area.
There is no cure but you can change their future with intervention. There are many many interventions out there, join a forum for Autism or go to your local Autism Society and you will find hundreds of parents just like you, willing to share their stories. They will share what worked for them and what didn’t. Unfortunately, what works for one child may not work for another. We have been fortunate that all the interventions we have done have made a difference.
Life with Autism isn’t easy but there are lots and lots of bright spots. You just have to look for them.
I wouldn’t change who my children are for the world. If I could go back and do things such that they would still be the kids that they are with out the Autism, I would. However, I cannot change genetics. Autism runs in my family.
Katrina
Technorati Tags: autism,awareness,ribbon,flower pin
Rebecca here:
Thank you, Katrina, for this post! I am so thankful for all of the children in my life that have special needs (my own kids are part of this bunch)! My life would not be as full without them. As far as Autism goes, I am so thankful that my Nephews have Katrina as their Mother! She is so hard working in getting them everything they need! This is something that is an epidemic and we all need to do something about it! We can all start with not judging others, as you never know what that person's situation really is. I think a big thing with Autistic children is that they look just like everyone else. There are no telltale physical signs that let you know that child has Autism. If you saw my Nephews, you'd see what I mean because they are absolutely gorgeous boys!
I cherish the times when all the cousins are running around together with no thoughts to who "has" what! No one says anything about my Daughter's speech delay, or my Son's hyperactivity, no one slows down when they see one of the cousin's with his back pack on that is feeding him through his stomach, and no one says anything when the cousins with Autism are overwhelmed. I love that our children just love each other for who they are! What a great bunch of kids we've got! It reminds me of my own childhood and running around with my cousins. We have kids of every nation, in our family running and playing together...not even noticing that there were differences between us. If we could now get the rest of the world to be so wonderful!
Rebecca here:
Thank you, Katrina, for this post! I am so thankful for all of the children in my life that have special needs (my own kids are part of this bunch)! My life would not be as full without them. As far as Autism goes, I am so thankful that my Nephews have Katrina as their Mother! She is so hard working in getting them everything they need! This is something that is an epidemic and we all need to do something about it! We can all start with not judging others, as you never know what that person's situation really is. I think a big thing with Autistic children is that they look just like everyone else. There are no telltale physical signs that let you know that child has Autism. If you saw my Nephews, you'd see what I mean because they are absolutely gorgeous boys!
I cherish the times when all the cousins are running around together with no thoughts to who "has" what! No one says anything about my Daughter's speech delay, or my Son's hyperactivity, no one slows down when they see one of the cousin's with his back pack on that is feeding him through his stomach, and no one says anything when the cousins with Autism are overwhelmed. I love that our children just love each other for who they are! What a great bunch of kids we've got! It reminds me of my own childhood and running around with my cousins. We have kids of every nation, in our family running and playing together...not even noticing that there were differences between us. If we could now get the rest of the world to be so wonderful!
Tuesday, March 23, 2010
Duct Tape Marshmallow Shooter/Ammo Belt

I am so sorry that it has taken me so long to finally get this tutorial up. February crawled by with my family getting the flu just after my son’s party and then one cold after another all month long. I have no idea what happened with March! Other than I have been playing catch up and doing this and that at my boys’ school. Anyway, enough with the excuses, it is time to get this tut on! We also managed to make it to the Renaissance festival with Rebecca and the rest of the family. It was fun watching all the cousins sword fight with their new wooden swords (thanks Papa). By the way this kind of belt would work well for holding a sword as well. ;)
You might remember back in February I had an awesome Lego Agents party for my 8 year old. One of the favors was a duct tape belt to hold their shooters and an ammo canister. GO HERE TO SEE PART ONE OF THE PARTY. GO HERE TO SEE PART TWO OF THE PARTY WITH THE BELTS I promised a reader that I would post a tutorial.

First you want to measure around the child’s waist. Make sure it fits a little loose and over laps about 3 inches in the back. This is something you want to try to make ahead of time. If you are unsure of how big the party guests are then you can make up a bunch of belts in various lengths. The day of the party you can trim them down and add the Velcro closures.

This step is fairly simple. Just fold up the bottom edge. It can be a little tricky when doing this with a long belt. Start at one end and fold over about 5 inches at a time. This will be the finished width of the belt so don’t fold over too much. About a half inch or so.

For this step I highly recommend that you leave the second layer of tape on the roll and unroll as you need more. You will be lining up the bottom edge with the folded edge of the first piece of tape. By unrolling the tape as you go you will have less trouble with the tape sticking where you don’t want it to.

Now flip it over and fold down the top edge. This is your belt.

This is the tab or strap (whatever you want to call it) that will hold the shooter on one side and another for the ammo canister (film canister) on the other side. Eye ball the length you need to go around the canister or shooter plus the width of the Velcro. You can always trim it down if you need to. Fold over the tape on itself (this is the part that will go around the shooter.
If you were going to make this for a sword, I would just fold the tape in half at this point. Make it long enough so that the sword will slip through plus extra on both sides to tape down. Then trim it to the width of the belt. Use a piece of tape on either side as I did in step 7. I would suggest laying your sword between the belt and the strap to make sure you have left enough room to get the sword in and out of the belt.

Just snip the strap so that you can fold over the exposed tape.

Cut another piece of duct tape and wrap it around the taped end of the strap to help it hold the weight of the shooter.

Trip the edges of the strap to match the width of the belt.

A little not about the Velcro. I had bought some “Scotts” brand hook and loop with permanent adhesive on the back. I found that it didn’t stick to the duct tape as well as the “Velcro” brand adhesive backed Velcro that I used in the first two I made for my son. There was at least one belt that I ended up using staples to keep the Scotts from coming off again. Just make sure the staple ends are on the Velcro side of the belt so the kids don’t get scratched.
The Scotts brand is in the photo above and the Velcro brand is in the picture below. For some reason the loop portion of the Velcro comes in dots and the hook portion comes in a strip from the same package.

Here is the closure in the back with about 2-3 inches of Velcro overlap. This worked out well because when you add the weight of the shooters to the belt it will weigh it down quite a bit. Some of the kids needed us to adjust their belts a little tighter. Also this will allow for them to wear these over other layers of clothing depending on the time of year.
Katrina
Thursday, February 11, 2010
Lego Agents / Secret Agents Party- Part 2

Secret Agent Badge/Lanyard
My son got one of the Agent sets for Christmas and it came with an Agent badge. That gave me the idea that all the kids should each have a badge. Using my trusty Photo Shop Elements I came up with something I am happy with. I used the original card from the set as inspiration. I did a lot of cutting and pasting and came up with a different Lego character for each child at the party.

I also added a place to put their “finger print” on the badge. Since they are secret agents their print is in glow-in-the-dark ink. We decided to draw shapes (some were letters L E G O) on the kids' thumbs and then have them transfer the “print” to their ID card. This way when they go through security their mark will show up under black light to confirm their identity. Each child was asked ahead of time to RSVP with their “Agent Name.” This way I could have their cards printed out. So they would be ready to be finger printed then laminated when they got to the party.
The picture below is their special shape, under the black light! The kids went wild over this...wait a minute, so did the adults!

They were given a lanyard to hang their badges around their necks. Thanks Rebecca for taking on the task of getting all those badges finished up! Ok so the cool factor was the kids got to see that their print was transferred to the badge. There were a few late arrivals that we went ahead and drew the symbols right on the badge. They never knew the difference. So for the sake of getting stuff done ahead of time, go ahead and draw the glow in the dark shapes on the badge ahead of time and make up the badges so they are ready to go. You can always draw on the kids' thumbs when they get there.

Marshmallow Shooters:
Every agent needs a handy weapon. They need one that can be changed to suit the situation. These shooters fit the bill perfectly. Think about it who would stop someone with a bunch of PVC pipes in a bag? The agents could disguise themselves as plumbers. LOL

Since last summer I have been dying for an excuse to make mini marshmallow shooters that I saw on THIS BLOG and THIS BLOG . I picked 3 different plans that I liked. Two were smaller simpler shooters but good options for making masses of them. The THIRD ONE was a rifle style but the measurements on all the plans we saw made for one big gun that used about 4 feet of PVC! It looked really cool but it was way over sized (even for a small adult) and that was for the small one! We played around with the smaller pieces from the smaller styles (featured at the top of the above image) and came up with a smaller more kid friendly sized rifle style shooter. The added bonus is that all we had to do is add in an extra 2 inch piece and a mouth piece (connector) to the kit that allows the kids could choose to make both the smaller styles or just one of the rifle style shooter.
The styles that the kids came up with were pretty much as unique as the kids, each made it their own. It cost us $2.26 for 2 feet of PVC and 8 connector pieces for each shooter. Not a bad little party favor if you ask me. One 10 foot 1/2 inch PVC pipe made 5 shooters. If you buy the connectors in bulk packages they will cost you $0.27 and under (depending on the piece) for each one. We made kits for 20 shooters, 14 for the kids and a few extras for adults to play along too.
Oh and I suggest splurging on the PVC cutter. Sooooo much easier than using a hack saw or anything else. Cuts right through it like…well pruners through a branch. Leaving behind a nice clean edge (that you don’t have to sand down). They look a little like pruners and cost about $16 depending on the pair you get. You can find them where they sell the PVC pipe. By the way the pipe we used said it was for drinking water.
We also ran all the pieces through the dishwasher ahead of time. Use alphabet stickers or a label maker so the kids can put their names on their shooters. We gave each kid a label with their agent name on it.
Each kit had the above picture on a sheet of paper. On the back were some rules of combat. You know things like: Don’t eat used marshmallows off the ground (if we had used the marshmallows) or shoot into each other’s mouths, don’t use the shooters like swords, Have fun, make sure everybody has fun, wear eye protection at all times.
After the kids built their shooters. We gave them 3/4 inch pom poms to shoot (which they put into their ammo holder-film canisters on their belts). There are some pretty serious food allergies in the family so I decided to go with a non-food ammo option. I had also bought mini marshmallows, Kix cereal, and was looking for puffed corn cereal (the kind with no flavoring on it that is just round pieces of puffed corn). I also took the time to make some balls out of Model Magic. It is that foam like play dough stuff that air dries. I used the rest of the Model magic package as bases for the targets I made. We never did take out the food ammo options because the pom poms worked so well. The best part is that I had nothing to pick up after the party. No sticky mess! The kids guarded their ammo and made sure that there wasn’t a single one left behind. WOOOO WHOOOOO! NO CLEAN UP FOR ME!!!
Targets:

I made these targets by printing up some printable targets I found HEREand then laminated them. I printed out two sizes on card stock. I was able to get 2 large targets on one 8.5x11 piece of paper and 5 smaller targets. I cut out the targets and laminated them. I then cut a wide border of laminate around the targets to give the kids something a little larger to hit. I used some Model Magic to make the bases because we wanted them to get knocked over when hit. It is a modeling compound that comes in foil pouches. It is a lot like Play Doh but it feels more like foam. I formed the bases around the laminate targets and then let it air dry for 24 hours.
I was worried that anything too heavy wouldn’t get knocked over by pom poms. The targets were for practicing their aim and because I didn’t want to encourage the kids shooting each other. I was a little worried that some of the parents of invited friends wouldn’t appreciate us giving their kids “guns”. I called them shooters but really they are air guns. I have to tell you that it was a little windy the day of the party so the targets were a bust. However, the pom poms were super soft and nobody got hurt. The kids took the “Secret Agents” theme and ran with it. It was like one big secret agents play date.
One mom, of a kindergartener, was a little nervous at first but when she saw how well all the kids were playing she was totally fine with it all. Thanks Anjeanette, for handing out and getting the shooter play going. I also have to thank my husband, who was sick that day, for trying hard to get the targets to work for us. I am just glad the rain cleared up for the day!
We sent some targets home with guests. There was enough for each family to take home two.
Eye Protection/Goggles……

Every trainee needs eye protection while on the shooting range. We had on hand empty soda bottles to make into eye protection (thanks to Nana). You can find vinyl tape at stores like Target in the isle with the duct tape and electrical tape as well as any old hardware store. It isn’t expensive and comes in packs that contain several colors. I like a little variety myself. We were going to use it as trim around the edges however, that was time consuming so we opted to use it as straps for the smaller kids. Because the bottles are curved there was no need for straps for the older kids. They liked that they stayed on by themselves. If you don’t want to make eye wear, try checking out your dollar store. Some time in the spring through summer they usually carry sun glasses for $1 each. Or you can check out the party store for a package of sun glasses (assuming they have some other than the star and heart shaped ones.)

I used the safety glasses (left side of photo) from a kit the boys had and traced around the edges. I wanted the goggles a little bit bigger so I used the tracing as a guide for the shape and cut out a larger version. I used card stock for my template. We then traced the template with a Sharpie on to the soda bottles and cut them out. You can get two pair of goggles per soda bottle. We used vinyl tape doubled over to make the straps. To attach them to the goggles we used squares of sticky backed velcro. You could use ribbon or elastic for the strap as well. Though the kids didn't seem to need it, you could use a little Model Magic to make the bridge around the nose less sharp.
Holsters for ammo and shooters………

I was seriously considering sewing some sort of holster for the shooters but it was a almost last minute thought that would have left me scrambling to make 15. However, like a dog with a bone, I just couldn’t leave well enough alone. Sewing 15 belts was out of the question but…..trusty old duct tape and a little bit of sticky backed Velcro and voila! You can even get it in colors if you want. I used what I had on hand. Pretty clever right? Well, I think so. ;)
If you ask me “pretty please” I would be happy to do a tutorial on how I made the belts. They will hold one shooter and one film canister crammed with pom poms (you will not believe how many pom poms the kids can cram into those little canisters!) or two shooters.
The down side to the belts is that you can only make the strip for the belt ahead of time. We had kids ranging from 4 to 15 coming so I didn’t dare try to guess. If they were all roughly the same size as my son then I would have gone ahead and made them up ahead of time. Once the party guest arrive you can size them up for a belt and cut down the strips you made ahead of time. Since you don’t know the size ahead of time you can’t add the straps to hold the shooter and film canister. You pretty much want them to be at their sides. So Thanks to Melissa (a sister-in-law you haven’t met) for helping me get all those belts made.
There were 14 kids all running around my smallish backyard and even the Autistic ones had a great time! Seriously, 3 autistic kids(two are mine), 11 typical kids all ranging from 4 to 15 plus about as many adults and everybody had a great time. WITH NO MELTDOWNS! Which is saying A LOT. Granted all 3 are high functioning but it was a little bit touch and go with our friend’s son at first. I let his mother know that if he needed space it was fine to go in our son’s room to decompress. I also let her know that if he needed to go home she could leave her daughter with us and not worry. It is important to let the parents of special needs children that whatever happens is OK and not to worry. If a meltdown happens……it is OK, we have all been there before. All the kids at the party have witnessed an Autistic Meltdown before and think nothing of it. Though thankfully the days of true meltdowns are pretty much behind us. Now it is mostly mini tantrums. (Ok here is where I cry a little because they are all such a fantastic group of kids and I am so proud of them all.)
The kids got to take home their shooter kits, goggles, belts, badges, targets, cool spy stuff packet, and pom poms in their film canister. What I like about their “goodie” bag items is that they aren’t just stuff that is given out at the end of the party. I like to give items that are used during the party. I know that these are items that are going to get used over and over and over again. Honestly it didn’t cost me all that much for the gear. I haven’t added everything up but…I would guess that I spent under $5 per kid on this stuff. Most of the items I made from stuff I already had. I choose to spend my party money on items for the party rather than a bunch of decorations. I have some basic decorations like a happy birthday banner that usually go up and I reuse them year after year. For the food we bought a huge sub, soda, juice, a veggie tray, a fruit tray, chips (corn and potato), dip, salsa, guacamole and the cake.
Is this post long enough?! Boy, I take a month off of posting and suddenly I write up the biggest run on post you could possibly do. Ok, so I could have gone on and on cause I am like that some times. Thanks for hanging in there with me. ;)
Katrina
Technorati Tags: Lego,Agents,Party,Marshmallow shooters
Rebecca here. This party was so much fun! Everyone (adults included) thoroughly enjoyed themselves. My kids are still playing with all their loot. I love loot that isn't just thrown away the day after the party. There was some serious creativity going on at this party. From the beginning with the ultra cool ID badges, then onto the shooters, eye protection, targets, and holsters! My hat is off to Katrina on a job very well done! ;) Of course, I am also partial to that lot of kids at the party. Just having our whole family invited (with no additional guests), is quite the full house!
We're linking this post up to these parties: Life as Lori, Fireflies and Jellybeans, Somewhat Simple, Look What I Made, Twice Remembered, Sumos Sweet Stuff , Trendy Treehouse
Rebecca here. This party was so much fun! Everyone (adults included) thoroughly enjoyed themselves. My kids are still playing with all their loot. I love loot that isn't just thrown away the day after the party. There was some serious creativity going on at this party. From the beginning with the ultra cool ID badges, then onto the shooters, eye protection, targets, and holsters! My hat is off to Katrina on a job very well done! ;) Of course, I am also partial to that lot of kids at the party. Just having our whole family invited (with no additional guests), is quite the full house!
We're linking this post up to these parties: Life as Lori, Fireflies and Jellybeans, Somewhat Simple, Look What I Made, Twice Remembered, Sumos Sweet Stuff , Trendy Treehouse
Tuesday, February 9, 2010
Part One of the Lego “Agents” Party
For my son’s 8th Birthday party he wanted a “Lego Agents” theme. The timing could have been better since it seems that Lego is phasing out the “Agents” collection. Such is life. However, Legos and Secret Agents by them selves will never go out of style. It seems that every little boy in my life these days is planning a Lego themed party.

Lets start with the invitation. I was trying to be clever, secret agent style, with the invitation. However, I could not make it too cryptic otherwise some people might not have a clue what it was about. Ha! I had one mother call and RSVP and in her message she was asking if she got the date and time right because it wasn’t very clear. OF COURSE IT WASN’T TOTALLY CLEAR! WHO WANTS THE ENEMY SHOWING UP FOR YOUR BIRTHDAY PARTY! ;) LOL She is a very nice person and she got it exactly right too funny! To make the invitation, I scanned in a folder and used Photoshop for the rest. Cool right?……………….
Well, anyway I thought so. :)
When my son told me the theme he wanted he also asked that I make a cake that is a Lego Agent. WARNING!!! IF YOU MAKE A FANCY DETAILED CAKE ONCE, THEY WILL FOREVER WANT TO HAVE FANCY DETAILED CAKES. I AM BEYOND THRILLED WITH THE FINAL RESULT!! I have no formal training with cake making and decorating. This was all fly by the seat of my pants with a consultation from my professional cake making sister over the phone with fondant questions. (she is in another state or I would simply ask her to make the cake)
The cake portion of this was baked the night before and carved and decorated the morning of the party. The colors aren't exact because it is VERY hard to get dark colors with frosting. You have no idea how much blue gel coloring I added just to get the blue as dark as it was here. I used pictures of the "Agents" Lego figures to give me an idea of how the uniform looked and added some details of my own. Basically I didn’t worry about being exact but did try to replicate some of the details so that there would be no question about what kind of Lego Mini figure this is. That and the Birthday boy was every excited and as always complimented me a lot. I actually have fun working on the challenges his cake requests give me. However, I do not want to do it for a living.

For the head I used a Styrofoam ball covered in royal icing and then covered in rolled fondant. I cut the hand shapes out of floral foam and covered them like I did the head. My little guy wants a Lego Indiana Jones Birthday party this summer so I wanted the head and the hands to last. The fondant dries hard and will last a long time. The body is carved out of a 9x13 2 layer cake. For the hands and the feet I made two 8x8 cakes layered like the body. The best thing about carving a cake is that you can let your child have a bit of cake while you are decorating it. There was plenty of samples from the trimmings. I don’t go hog wild for decorations all over the house. I put much of my efforts into the cake and the favors and activities. After all the cake can’t be baked until the night before and decorated the day of. Gluten free baked goods are best when fresh.
By the way I used Bob’s Red Mill cake mixes. Two chocolate flavored mixes and two vanilla flavored mixes. People were confirming that it was indeed gluten and dairy free while they were eating their cake. Even Anjeanette had to confirm that it was dairy free (even though I always make gluten and dairy free cakes for my kids and it has been 5 years since I have made a “regular” cake.

The cupcakes were a last minute addition. I was looking at where to put the candles. I had just spent a couple of hours sculpting the cake and just didn’t want to stab it with candles. I think it was my Dad that suggested he should have cupcakes in his hands. The light bulb went on and I decided it was the perfect solution to where to put the candles. My son decided they were bombs. :) The down fall was that all the kids wanted the cupcakes. The kids were disappointed that they were not allowed to eat the head and hands. They still wanted to eat the fondant even though there was foam under it. (I now have them packed away in plastic bags with silica gel packets in them to preserve them till June. To keep them clean I put plastic wrap between the head, hands and the cake.

Since everybody knows who’s party it was, I didn’t bother writing anything on the cake. In one corner of the cake board I did write the number “8”.
When I frosted the cake the cake board got a little “messed up” with frosting dropped on it and cake crumbs that were whipped off and left a wet mark. Soooooo I pulled out a large paint brush and “painted” the cake board with frosting. I did wet down the brush a bit to thin out the frosting. I was going for a background that looked a bit like sky. Ummm I mean I totally planned on painting the cake board to make it look cooler than plain white cardboard. ;)
I came up with a secondary theme of Secret Agents for ideas for the the rest of the party. Since that is basically what I think Lego Agents are. So I put Google to good use and looked up “Spy Gear.” I came up with a few sights that had some fun items for the kids to make. You can go HERE or HERE for some great spy gear projects and more. I printed up the best projects and put them in folders for the kids to take home. That way their "spy" fun can continue after the party. Plus there would be enough time to do all the fun things I found. I gave one folder to each family (which greatly cut down on how many copies I needed to make. Most of our guests come in twos or threes per family.) The fun didn’t stop there……but that is for another post. ;)
I had planned on doing just one post for this party but……. it would have been a REALLY REALLY long post and I would have left a lot out. The girls talked me into splitting it up and adding more details.
That and I thought the cake deserved a post all on it’s own. I wanted to do a happy dance when I finished just the head and then hands. Seriously I almost starting calling people to tell them about it. This is me doing something new and being totally sure about the fact that if it worked it would be super cool. Then to have it turn out as good or better than I imagined just made me want to have a mini party to celebrate. ;) Then the morning of, with my parents and the boys watching nearly every move while I sculpted the rest. I believe they had fun watching. Not to mention my boys coming by like little baby birds with their mouths open for some frosting. Only to be disappointed when I told them they had to wait till I was done decorating. I used nearly a full tub of Wilton cake frosting. No…not the little tub……yeah the big $12 tub that I got at 40% off with my trusty Michael’s coupon.
Ha! This post was a little long all on it’s own…can you imagine what it would have been like if I did one post for the whole party!? I can’t wait to share the rest.
Katrina
Update: Bob from Bob's Red Mill Tweeted about my Lego Cake! "Beautiful Lego-Agents cake using our chocolate and vanilla cake mixes" Thanks Bob!

Lets start with the invitation. I was trying to be clever, secret agent style, with the invitation. However, I could not make it too cryptic otherwise some people might not have a clue what it was about. Ha! I had one mother call and RSVP and in her message she was asking if she got the date and time right because it wasn’t very clear. OF COURSE IT WASN’T TOTALLY CLEAR! WHO WANTS THE ENEMY SHOWING UP FOR YOUR BIRTHDAY PARTY! ;) LOL She is a very nice person and she got it exactly right too funny! To make the invitation, I scanned in a folder and used Photoshop for the rest. Cool right?……………….
Well, anyway I thought so. :)
When my son told me the theme he wanted he also asked that I make a cake that is a Lego Agent. WARNING!!! IF YOU MAKE A FANCY DETAILED CAKE ONCE, THEY WILL FOREVER WANT TO HAVE FANCY DETAILED CAKES. I AM BEYOND THRILLED WITH THE FINAL RESULT!! I have no formal training with cake making and decorating. This was all fly by the seat of my pants with a consultation from my professional cake making sister over the phone with fondant questions. (she is in another state or I would simply ask her to make the cake)
The cake portion of this was baked the night before and carved and decorated the morning of the party. The colors aren't exact because it is VERY hard to get dark colors with frosting. You have no idea how much blue gel coloring I added just to get the blue as dark as it was here. I used pictures of the "Agents" Lego figures to give me an idea of how the uniform looked and added some details of my own. Basically I didn’t worry about being exact but did try to replicate some of the details so that there would be no question about what kind of Lego Mini figure this is. That and the Birthday boy was every excited and as always complimented me a lot. I actually have fun working on the challenges his cake requests give me. However, I do not want to do it for a living.

For the head I used a Styrofoam ball covered in royal icing and then covered in rolled fondant. I cut the hand shapes out of floral foam and covered them like I did the head. My little guy wants a Lego Indiana Jones Birthday party this summer so I wanted the head and the hands to last. The fondant dries hard and will last a long time. The body is carved out of a 9x13 2 layer cake. For the hands and the feet I made two 8x8 cakes layered like the body. The best thing about carving a cake is that you can let your child have a bit of cake while you are decorating it. There was plenty of samples from the trimmings. I don’t go hog wild for decorations all over the house. I put much of my efforts into the cake and the favors and activities. After all the cake can’t be baked until the night before and decorated the day of. Gluten free baked goods are best when fresh.
By the way I used Bob’s Red Mill cake mixes. Two chocolate flavored mixes and two vanilla flavored mixes. People were confirming that it was indeed gluten and dairy free while they were eating their cake. Even Anjeanette had to confirm that it was dairy free (even though I always make gluten and dairy free cakes for my kids and it has been 5 years since I have made a “regular” cake.

The cupcakes were a last minute addition. I was looking at where to put the candles. I had just spent a couple of hours sculpting the cake and just didn’t want to stab it with candles. I think it was my Dad that suggested he should have cupcakes in his hands. The light bulb went on and I decided it was the perfect solution to where to put the candles. My son decided they were bombs. :) The down fall was that all the kids wanted the cupcakes. The kids were disappointed that they were not allowed to eat the head and hands. They still wanted to eat the fondant even though there was foam under it. (I now have them packed away in plastic bags with silica gel packets in them to preserve them till June. To keep them clean I put plastic wrap between the head, hands and the cake.

Since everybody knows who’s party it was, I didn’t bother writing anything on the cake. In one corner of the cake board I did write the number “8”.
When I frosted the cake the cake board got a little “messed up” with frosting dropped on it and cake crumbs that were whipped off and left a wet mark. Soooooo I pulled out a large paint brush and “painted” the cake board with frosting. I did wet down the brush a bit to thin out the frosting. I was going for a background that looked a bit like sky. Ummm I mean I totally planned on painting the cake board to make it look cooler than plain white cardboard. ;)
I came up with a secondary theme of Secret Agents for ideas for the the rest of the party. Since that is basically what I think Lego Agents are. So I put Google to good use and looked up “Spy Gear.” I came up with a few sights that had some fun items for the kids to make. You can go HERE or HERE for some great spy gear projects and more. I printed up the best projects and put them in folders for the kids to take home. That way their "spy" fun can continue after the party. Plus there would be enough time to do all the fun things I found. I gave one folder to each family (which greatly cut down on how many copies I needed to make. Most of our guests come in twos or threes per family.) The fun didn’t stop there……but that is for another post. ;)
I had planned on doing just one post for this party but……. it would have been a REALLY REALLY long post and I would have left a lot out. The girls talked me into splitting it up and adding more details.
That and I thought the cake deserved a post all on it’s own. I wanted to do a happy dance when I finished just the head and then hands. Seriously I almost starting calling people to tell them about it. This is me doing something new and being totally sure about the fact that if it worked it would be super cool. Then to have it turn out as good or better than I imagined just made me want to have a mini party to celebrate. ;) Then the morning of, with my parents and the boys watching nearly every move while I sculpted the rest. I believe they had fun watching. Not to mention my boys coming by like little baby birds with their mouths open for some frosting. Only to be disappointed when I told them they had to wait till I was done decorating. I used nearly a full tub of Wilton cake frosting. No…not the little tub……yeah the big $12 tub that I got at 40% off with my trusty Michael’s coupon.
Ha! This post was a little long all on it’s own…can you imagine what it would have been like if I did one post for the whole party!? I can’t wait to share the rest.
Katrina
Update: Bob from Bob's Red Mill Tweeted about my Lego Cake! "Beautiful Lego-Agents cake using our chocolate and vanilla cake mixes" Thanks Bob!
Technorati Tags: Lego,Agents,cake,party
Linking up to DIY Day, and Today's Creative Blog and The Girl Creative, and Blue Cricket Design, and WFMW, Life As Lori, Fireflies and Jellybeans, Somewhat Simple, Look What I Made, Twice Remembered, Sumo's Sweet Stuff, Trendy Treehouse!
Linking up to DIY Day, and Today's Creative Blog and The Girl Creative, and Blue Cricket Design, and WFMW, Life As Lori, Fireflies and Jellybeans, Somewhat Simple, Look What I Made, Twice Remembered, Sumo's Sweet Stuff, Trendy Treehouse!
Monday, January 18, 2010
Valentines Day 2009 Recap #2

Thanks for all your comments on the first Valentines Day Recap! Ladies, you made our day! ;)
Are you ready for round two? We have some fun ideas for all. Sew…..lets get to it!
![[11+++5+finished+pillowcases.jpg]](https://blogger.googleusercontent.com/img/b/R29vZ2xl/AVvXsEhH4VuSLbXZfJwq3XN5danwaKX8jEhhC_vVbcN_t2MRJDbO78KkXkUsk8j-Agpn4c2elHwJZ5bDhcGHmG4vGkgiusOy1yeNd-tPj0BltRjIRMimdukC0PNtIZEGBgKlqLZNQ8EZVsBP7bOd/s1600/11+++5+finished+pillowcases.jpg)
Valentines Pillowcases! I love this idea. Anjeanette, my boys could use a couple of these. ;) LOL She has a great tutorial to show you just how she made these lovely pillowcases. Rebecca includes pictures of pillowcases from past years. They really do give you tons of ideas for these. Not into having themed full sized pillow cases? How about making one for a mini travel pillow? Check out my tutorial for how to make a quick and easy travel pillow case. I have made Halloween and Christmas mini pillow cases so far and am looking in the remnants bin to see what I can come up with for Valentines day. My boys like to use the mini pillows for their teddy bears. They get so excited when I do little things like this for them.

Valentines themed food. Send them with a little love note in their lunch box. Check out the post to see what other everyday foods Rebecca shows her love with. Here is a hint, she likes to use color to add to the theme. It brings to mind Dr. Seuss and his Yink that like to wink and drink pink ink. Or maybe Green Eggs and Ham but that is for a different holiday. ;)

Valentines Tic Tac Toe Isn’t this sew cute!? It takes a little time and you can use a machine or sew by hand. However, it is also something that you can keep and use over and over. Why not make the tic tac toe board with white felt instead of pink. Then you can make shapes that go with other holidays as well and keep using it all year long? She has even added a pocket to the back to keep all the pieces in! Anjeanette is sew clever! ;)
![[_MG_5999.JPG]](https://blogger.googleusercontent.com/img/b/R29vZ2xl/AVvXsEjPjG_V1Pm0LySvqqo8a0O21rKcn6hgjcb_TrglbhUs8xgZ4vsuJsSf8GfAhSMS_4EQMpbrcynFFYT3fU0QlMVbM6g1Bcigj-iVEDN_7sE50kp3fsfQDTs-An2rHiOecpWx99oCLxgGJ84/s1600/_MG_5999.JPG)
Valentines Advent Mail box. Make Valentines day 14 times the fun with a mail box advent. Rebecca shows you how she dressed up this cute tin mailbox. Who doesn't like to get mail?! Why not make up some of Anjeanette felt envelopes (from the last recap) and use them in the mail box? The great thing about this is that you can customize the advent activities or goodies to your family. The possibilities are endless. Start with February first and put something in the mail box each day till the 14th. You can put little “What I love about you” notes inside or candy, handmade prizes (pillow cases, tic tac toes game, lollypops, items for a craft) or even a clue for a scavenger hunt. You are only limited by your imagination. Love it!

Nana's Valentines Day suckers. Nana (aka my Mother-in-law) is famous for making treats for every holiday that comes around. It is no wonder that her girls are all crafty. I love the idea of making my own suckers. Some day I will have to get molds of my own. If you don’t have hard candy molds and don’t have the time that these require, why not try another of Nana’s ideas? Make your own template and make chocolate heart suckers. You can use red or pink chocolate or even regular chocolate and pipe them into heart shapes and add the conversation hearts in the middle. If you don’t like conversation hearts you can use Valentines sprinkles. Love your ideas Nana!
![[IMG_6333resized.jpg]](https://blogger.googleusercontent.com/img/b/R29vZ2xl/AVvXsEhvt3yOFXaFGdvh4farC9MjjTIbgsz-fGYiqstd0_wdIPavxoN6LOnKAcNDQomx44jP3FovTPsDTu8ofTaLNuuknDkK8WcswNX-cRcvZW_YZojRPANjX0y3xR5_UBcoiYUhKKkKrAhmVQDb/s1600/IMG_6333resized.jpg)
Make your own Marshmallows! Have you ever made your own marshmallows? NO!!!! Then you really should try them. They aren’t that hard to make. Kind of fun actually. Ok, cutting them with cookie cutters is a little tricky but fun! The ladies made these last year and came up with two ways of adding a little something extra to coat them with. Back then I was a follower (one of the first I might add;). I decided to give them a try. I am not a big marshmallow fan but WOW homemade is SOOOOOOO MUCH BETTER! I was out of powdered sugar when I made these so I used a powdered frosting mix I had on hand. It consisted of powdered sugar and powdered vanilla flavoring. THEY WERE OH SOOOO YUMMY!. I would suggest coating your cookie cutter with non-stick spray if you want to make shapes. The cutters still get a bit gummy when coated in powdered sugar after you cut a few shapes. Do cut a few into shapes just for fun and make the rest little squares.
Now that you have made those marshmallows here is a yummy idea for a special Valentines treat using those Marshmallows.

Anjeanette reviews 3 ways to make felt fortune cookies. Ideas for these are all over the place. Last year Anjeanette decided to try a few out and give you her take on them. This really is a fun idea. I can see putting “what I love about you” notes in these and opening them at the end of dinner every night from February 1st till the 14th. Or use them when birthday’s come around. All the family members can write something special about the birthday person and put it inside. Then after dinner or dessert they can open their special notes. Maybe this can be done at breakfast. Then the birthday person can start their day feeling loved. The best part of all is that they are 0 calories, 100% allergen free and you don’t have to buy take out to get them! ;)
We are so glad you dropped by!
Katrina
We're linking up to Make Your Monday and a Silly Little Sparrow and Blue Cricket Design, and SomeWhat Simple.
Tuesday, January 12, 2010
Valentines Day 2009 Crafts Recap
Hello everybody! It is time to get ready and start thinking about Valentines Day. But first… Did you know that Roots and Wings Co posted our very first post on January 9th of 2009? If you have been with us since the beginning you will know that back then we had a different name for our blog. It was “Favorite Things From Our Family to Yours” or something very close to that. Back then it was just Anjeanette and Rebecca busting out crafts every day of the week. In fact they did 14 days of Valentines crafts. Ok it started out as just 14 days of Valentines Day crafts but they had so many ideas for their new blog that they threw in a whole bunch of bonus crafts as well. Today I am just going to high light a few. You can keep watching for my next Valentines day 2009 Recap or check out all our Valentines Day crafts HERE
![[IMG_7251.JPG]](https://blogger.googleusercontent.com/img/b/R29vZ2xl/AVvXsEhoiPCc48SUTv6Ek6NY05UNuvlWb9-U0cG6-4IeJ0WzuknpS_DNmBxL1a4u16RNAhHxCeD4pRz6baduzD7VCrwz8_heZjG4hb0Mi6Sh8axRdgalwpetW8GxH2Zxz0h74qZIu-j_o1ZW8GvV/s1600/IMG_7251.JPG)
MAKE VALENTINES DAY SPECIAL FOR THE WHOLE FAMILY. Rebecca gives you a peak into how she makes the day special for her family. Some of those crafts she had been making through out the whole “14 days of Valentines crafts “ were used to set the scene here. Talk about WOW! Can you believe she does this sort of thing for every holiday? She and the kids make paper placemats every month. Each one ties in with a theme or lesson she is teaching for the month.
![[IMG_7234.JPG]](https://blogger.googleusercontent.com/img/b/R29vZ2xl/AVvXsEhHiihgyr-8OhAVsmo7gX-13FObgrSgHoNL8hZeroflpaHB2SS3EsDXV88MvZzqkMN0NsXsAXLouOrVnDwZrm6e1TufdqNVKPb3Mm-dhHTCQQ01DL5MqrZOSLvaq_rvE4eIDJzFe88z6aYs/s1600/IMG_7234.JPG)
TEACHER GIFT BAGS. Don’t forget to show the love to teachers. It does not have to be something huge and expensive. Here Rebecca shows us how to dress up some homemade heart suckers (those are for another recap) for a special treat for teachers. So cute!
![[IMG_7198.JPG]](https://blogger.googleusercontent.com/img/b/R29vZ2xl/AVvXsEjgt2wSe5AFbSQyy-mGzcmfikkt16JF3SObLExb-5dkOY9xPTmUqI-mW33gcdPAkpZg9X7qSB75VGuE9hlJOf9ZWGrSpy7s2CMbuXBvARSkOM19etrLMCVf5MAwXYLTWzPdoVKmnSyKk6uM/s1600/IMG_7198.JPG)
VALENTINES DAY TEACHING TOOLS. As long as they are getting all the sweet treats, why not use them to teach pre-schooler’s their colors, sorting, and counting and graphing. When they are done they get a sweet reward at the end of the lesson. For older kids why not use them as visual aides for the math problems. 1 pink candy heart + 3 purple candy hearts = 4 candy hearts and YUM! There all all kinds of things you could use these for. How about fine motor skills for toddlers like stacking. How high can they make a tower of hearts? Put a rubber band around the end of some chop sticks to hold them together. Little hands can use them to pick up the candy hearts from a bowl and place them into another bowl. Again this develops fine motor control that will be needed for writing later on.
![[IMG_7215.JPG]](https://blogger.googleusercontent.com/img/b/R29vZ2xl/AVvXsEg2-L2dJaR99An1cyXoaZepEyZwD7qOTmjYlpTxOlEXKMQ8AwtlgwjQh6D8F2Dau8Se_TB2BgLkElxYlXcwOidN3p4zQl8111qrNLIwTLbbDqoC7Sho_sxRXGUZ4GAVhXgkjscGUdqy2Bfw/s1600/IMG_7215.JPG)
HANGING PAPER HEARTS. I know you have scrapbook paper just waiting for a purpose. If you are a crafter I am pretty sure you have scrapbooked. If you have scrapbooked I know you have purchased one of those GIGANTIC pads of scrapbook paper. I can tell you I have and since I have boys I have no clue how to use up all those pink papers. Last year Rebecca made these and I KNEW what I wanted to do with all my pink papers. If you have the paper already, I know you have brads. Paper, brads, ribbon and a cutter that is it! Make just a few or make a ton for a garland. Check out our FLICKR GROUP to see how I used these in my archway. Of course back then I was just a follower. Looking back over the year you probably have noticed that Rebecca is big time into paper crafts and Fimo clay. You can bet that her craft room is filled with paper and clay crafting tools.

THIS IS NO ORDINARY FOAM HEART GARLAND. Rebecca wasn’t the only one busting out with the Valentines crafts. Anjeanette did just as many. You have heard her say it before (all the time), Anjeanette dreams and thinks about sewing projects most of the time when she is crafting. She sews just about everything. I would be surprised if she didn’t use her sewing machine back when she was really into scrapbooking. ;) She is also a big fan of doing her own cut outs. She finds the shape she wants and starts cutting away. She is her own die cutting machine.
![[IMG_7123.JPG]](https://blogger.googleusercontent.com/img/b/R29vZ2xl/AVvXsEjADOG5hBHv655wePRBQERjDNKRYO-Kr0L59dvswMD1-7aFOKhMg8qOONnjHn_cUDJ7t8As9N-snmt5xOrdaauid06A58maZIWjch-PkDuPVfeP_K-tIGUXPrcYcuyhRv4AB4es7e5znKLl/s1600/IMG_7123.JPG)
EMBROIDERY MACHINE HEART PENCIL TOPPERS Rebecca put her embroidery machine to good use for this craft. Don’t have an embroidery machine? No problem, she gives you some other ideas on how to make felt pencil toppers with out the fancy embroidery. However, you can still get this look by doing a blanket stitch all the way around. For the initials you can get iron on embroidered letters at the craft store or use pre cut foam or felt letters. There is also good old puffy paint. Rebecca put these at each of her kid’s place setting on Valentine’s day. In the top picture you will notice that they pencils she put them on were actually Valentine’s themed pencils. A great way to make the homework station a little more “special” during the month of February.
![[10++sew+along+the+top+so+it+folds+nicely.jpg]](https://blogger.googleusercontent.com/img/b/R29vZ2xl/AVvXsEiBPSrPcLXEcMII8MUDmZxv3apYOClcQvrgfw04H5DW0CdHah4WFZ2GTvzI2tL4buygzmkCo97uflI47QMR8ik5_P37tKJiMuD5UWx83VGXj5q_Y2XR44lg4UK79TMc8F-S5OPm_aqGLVhE/s1600/10++sew+along+the+top+so+it+folds+nicely.jpg)
LOVE LETTER FELT ENVELOPES. I think is has been one of the most popular posts of the year. Anjeanette put together a tutorial for you on how to make this adorable felt envelope. I can think of so many uses for this little envelope. First it can be used to give some one a love letter and maybe a small treat. Then your child can use it all year long for pretend play. He or she can write “notes” and then play mail carrier and deliver the mail. This is the first of many posts Anjeanette did with felt. You have probably learned by now that she LOVES felt.
We have come a long way in a year. It has been fun going through our oldest posts to give you this recap. I know I said I was taking a step back this month and I am. I just couldn’t resist doing a recap or two of some of our favorite Valentine’s Day posts.
Happy Anniversary Girls!
Hugs!
Katrina
Linking to Somewhat Simple.
Subscribe to:
Posts (Atom)

 Posts
Posts