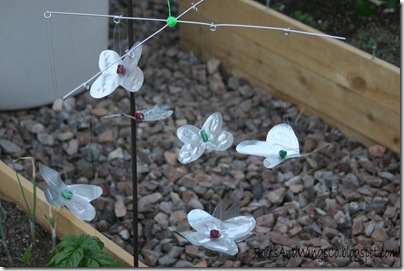
Showing posts with label Father's Day. Show all posts

Sunday, June 20, 2010

Happy Father’s Day!!!

image
I am so thankful for great Fathers!  They all deserve the very best Father’s Day!

That handsome guy in these pictures is my own Dad.  We call him Papa (well, we didn’t until his Grandchildren started calling him that).  I will never be able to repay him, for what he has done for me and still does for me. 

Thank you, Dad for always believing in me, encouraging me, and for being there for me and my children in so many ways!  Thanks for letting me join you on your Mensa hikes back in High School.  Thanks for taking my children to the bookstore, endlessly!  Thanks for letting me talk your ears off all of these years, and not making me feel like I was!  Thanks for teaching me by being such a caring, sweet, hard working, passionate man!  You mean the world to me!
image
I am also so thankful for all the other Fathers in my life.  The Father of my Children (of course!), my Brother, and my Brother-In-Laws!  I can’t leave out my two wonderful Grandfathers!  They helped shape my life and gave me so many wonderful memories!  Such truly amazing men, that I am so lucky to know and get to be a part of their lives!  I am so thankful that my children have all these amazing men in their lives as role models, friends, and co-conspirators!  I do believe that it takes a village…I am so thankful for my amazing village!

Rebecca

Thanks to Anjeanette as these pictures were ones she took, and I got them from her personal site!

Thursday, May 27, 2010

Crayon Etching On Metal Tins Tutorial

crayon etching 9d I love these etched tins and am to excited to show you how to do it!  My children made these tins for their Grandfather’s Birthday.  They literally drew the pictures onto the tins themselves and the designs were then permanently etched into the metal! 
I have actually etched a few metal things before these using two different methods.  Then, I was doing some research online and found this method and thought it was something my readers might want to try.  I saw a few variations on this but I mostly followed this tutorial, by Kylyssa on Squidoo.  My technique is a combo from what I had already done, and then hers, using the crayon for the resist.
crayon etching 1 Supplies: Pencil, copper wire, 6V Battery, Crayon, Metal Tin, Medium Plastic or Glass Container, wires with alligator clips attached on both ends, Acetone (Nail Polish Remover), sandpaper (if using an altoid tin or other tin with design and/or color on it), salt, and water.
Your supplies are shown above, and can all be bought at your local store like at Walmart. That 6V battery, I found in the camping department (they use them for lanterns).  They are about $1.  The wire and alligator clips can be bought at Radio Shack.  They are about $3.
You could use Altoid tins, however, I bought a huge supply of plain tins, as I’m using them for many things.  If you have Altoid tins you will need to sand off the design on the top (or anywhere that you want to end up etched), using sandpaper and lots of elbow grease!
If you buy tins from a hobby store that are like mine, you will still need to remove a protective layer they all have on them.  You can remove this by using acetone (or nail polish remover).  Make sure you remove all of this protective layer because the etching will not happen where any of that protective layer is left.
crayon etching d
I take the top off of the bottom before I start working with them.
crayon etching e
It makes them easier to work with and they come apart very easily, just be careful not to break the hinge.
crayon etching a
You will take your crayon and cover the tin in crayon.  Get as much crayon onto the tin as you can.  The crayon is actually going to be the part that resists the etching and the tin will stay shiny where you have crayon.  crayon etching b
Next you use an embossing gun (or hair dryer) to melt the crayon wax.  This is very important to get a nice crayon layer, as you will get pot marks of etched dots wherever the crayon did not end up covering.  I found this worked best by coloring a layer of crayon, melting the wax completely on the tin, and then adding more wax with the embossing gun going at the same time so it melts wherever you touch your crayon (because the tin is heated up and the crayon has the embossing gun over it as well).
crayon etching c
You want as good of a layer of wax as you can get.
crayon etching 9a
The above picture is what will happen if you don’t have a nice layer of wax.  This was my first attempt and actually I was pretty happy about it….until my next attempts were exactly how I wanted it!  If you look closely you can see lots of white dots etched all over the tin.  Yes, you do see the initials that I etched into the tin, but the rest of the tin does not have a solid shiny look that can be achieved if this is done correctly.
After you have your layer of crayon on you need to let it cool (those tins can burn you as you do this because the metal conducts the heat all the way through them).  crayon etching f
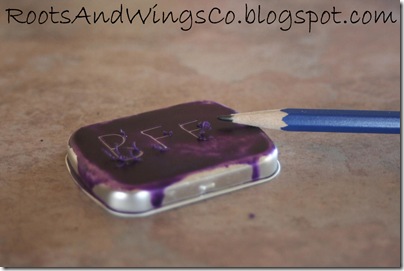
Take your pencil and draw a design into the crayon layer.  You want to go all the way through the wax to the tin.  This is quite easy to do.  But you are also not trying to draw onto the tin, either.  When you draw onto the tin, you are removing the wax.  The above picture shows how the wax can curl up in tendrils and still stay attached.  Make sure to brush this wax off or it can mess up your design by covering up some of the part that you drew.
crayon etching 4
Here is one that my Son drew up.  It is a picture of he and his Grandpa wearing pirate hats.  I did have my kids first draw out what design they wanted to do ahead of time.  I traced the tin shape a couple of times on a piece of paper to give my kids places to figure out what they wanted to draw.
I love what they each chose to do.  I was surprised by how easy this was for my kids to do.  I did not have to do any redos or even touchups on them.
crayon etching 2
Next you will set up your etching bath.  The above picture shows my set up. 
Bend the copper wire so that it holds onto the container on the side (as you see on the left side of my container).  Then you bend the wire back and forth the length and width of your container.  You do this so that you have an even current running through the container.
Boil some water on the stove and dissolve salt into it until you can’t dissolve anymore salt into it.
Put the bent copper wire in place in the container and pour in your salt water.  You should let the water cool off before continuing as the hot water could melt the crayon and ruin your design.
Attach the wires to the battery and into the water.  One wire will go from the negative on the battery, to the copper wire (see my yellow clips).  The next wire goes from the positive on the battery and then clips onto the tin (the green clips).  You will then float your tin (that is crayon covered and already has the design drawn into it) in the water with the design face down into the water.  To keep my tin completely level I draped the green clip’s wire over a glass.  This will help the tin to etch uniformly.
Leave your tin for 5-10 minutes.  You will see bubbles in the water and the water will get really yucky/mucky looking.  This is all normal.  The longer you leave the tin in the salt water, the deeper the etch will be.  Take your tin out and wash the gunk off and then remove the crayon. 
You could go one step further and put paint into the etched part, to accentuate the design.  However, I did not find that I needed to do this.
Here are my kids’ tins with their own designs on them:
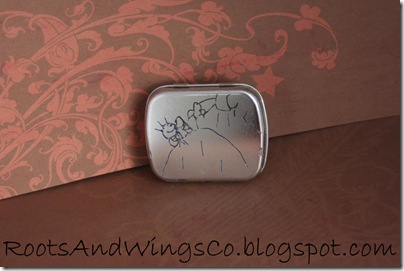
crayon etching 5The above tin is my Daughter and her Grandpa climbing a grassy hill.  The sun is in the top right corner, peeking out from a cloud.   
crayon etching 7
My oldest thought it through and knew her Grandfather would be using these for all his small parts.  She labeled one tin “gears and gadgets” and another “springs and stuff” and then drew gears and springs onto them.  I thought that was so ingenious.
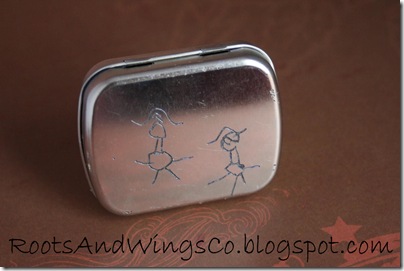
crayon etching 8
Here is my Son’s all finished up.  Notice how shiny the rest of the tin is?  We got good layers of wax on these babies to protect them during the etching.
crayon etching 9
Here they all are together.   
crayon etching 9d
My final thought is to have your kids also etch the bottoms.  I had my kids write a message as well as their name, age, and the year.
My kids’ tins say “You are #1 Grapa from______”, “Love You”, and “I (heart) U!”.
What person wouldn’t adore a momento like this?  I will be having them make some for themselves as well as for me! ;)
Keep tuning back in because I will have parts 2 and 3 to this tin etching!  Each one will show you a variation on this kind of etching!
Rebecca

I am linking to the following parties; Stephanie Lynn

Tuesday, November 3, 2009

Children’s Artwork Mug Gift

Hand print mug

Two years ago I came up with the idea to use artwork that my boys made to have printed on mugs for my Dad for Christmas. My little guy was only 3 at the time and was not drawing at the time. So I took an 8.5” x 11” white paper and put his hands in paint to make hand prints all over the paper. I then scanned in the image and put a title, his name and the date he made the artwork. I then went to Walgreens.com and ordered the mug to be made and shipped directly to my Dad.

Hand print mug view 2

It is like holding their hand every time they have coffee or tea.

childs drawing view 1

This was the mug I had made out of my 5 years olds drawing. It is a little harder to get him to do an art project on the spot. He more or less has to be inspired before he starts drawing. He draws all the time and back then was never with out a pen and paper. It was like therapy for him. It soothed him. Still does. When I scanned in his artwork, I labeled all the different parts of the drawing. It is quite plain to see what he has drawn, although he did inform me that I got one of them wrong when he saw the mug. LOL

childs drawing view 2 There are many companies out there that will do this kind of thing. Some are better than others. You also have to pay attention to where they place the design. Last year I ordered a picture mug from a different company and they always put the picture opposite the handle. Which means you don’t see the picture if you are holding it by the handle. Another thing the images may not last as long when washed over and over in the dishwasher or if kept in direct sunlight. Although, my parents use these mugs just about every day and wash them in the dishwasher. Just be sure to pay attention to product details about how to store and wash them. My Dad was kind enough to take these pictures of his mugs for me so that I could share it with all of you. Thanks Dad!!

He LOVED these mugs and had to be convinced to use them. My parents use them all the time. They just hand wash them instead of putting them in the dishwasher. Although, I believe they have gone in the dish washer from time to time. I am glad to see that they have held up well.

This year the school is doing a fund raiser where they are having the kids make artwork for just this purpose. I can order any number of products with the artwork my boys have created. So personal and fabulous and a great way to keepsake your child’s art.

Katrina

Today's Thankful

I am thankful for my handsome loving husband. He works so hard for us. He has given me two beautiful boys and the ability to stay home with them. He is a great father and fantastic husband. Further more he does not complain about our little menagerie of pets or the fact that my boys are always asking for more pets. We just laugh and tell the boys we have enough...for now. He just smiles as we coo over animals that aren't ours.

Katrina

Heartfelt and Handmade Holidays

Sunday, June 21, 2009

Happy Father's Day!!!

Perler Bead fun. Just a little sneak peak at what I am going to do with them.
Happy Father's day to my Dad, Father-in-Law, Grandpa, and last but NOT least my Husband!! To my Grandpa-in-Laws up in heaven, we miss you very much. I wouldn't trade a single one of them. I am lucky to have so many amazing men in my life.
From our family to yours.................Happy Father's Day!!!
Katrina

Friday, June 19, 2009

Not Your Run-of-the-Mill Father's Day Gifts


Wow, this week has been full of lost of GREAT Father's Day gifts. One thing I keep coming back to is that I don't want to make something that my Husband and our Fathers already have. How many cans turned into pencil holders can you have? While wall hangings with hand prints are great, even if they have been given before, still some times it is nice to take a break. I wanted to find inspiration for something that is sentimental and useful all at the same time. This is no easy task when you want to think outside the box.

I found an idea about making shoe odor and moisture neutralizers using kitty litter inside a sewn pouch. Then I got the idea to add footprints to them. At first I thought about just adding my children's footprints to the fabric. But I knew they would be on the small side. So I thought I would use my own foot as a template to enlarge the foot. Now comes the sentimental side. It got me thinking about following in footsteps. It got me thinking about how as kids we walk in our Father's shoes for fun. I remember doing it myself a time or two and now my kids like to put on my husband's shoes. So I came up with my boy's foot prints on one side and my husband's foot prints on the other. Then these feet will go in my Father-in-Law's shoes. They are cute little pillows with his son's and grandson's footprints on them. They can be used in his shoes or any other place he wants to wick up moisture and/or odor.

I used:
-material scraps that were fairly plain and lighter in color so the prints would easily be seen.
-Fabric paint.
-For the filling I opted to use a product called "Yesterday's News" which is a kitty litter but it is recycled news paper made into pellets. I normally use it in the litter boxes in my guinea pig cages. Don't worry I used fresh litter. ;)
-I also have a couple of silica gel packets that I had saved (for who knows what reason). I will add one packet to each "foot" for added moisture control.
-I also have some essential oils on hand (you can get them at a health food type store). For this I decided on peppermint. Though lavender would also be nice.
I am trying very hard to make use of what I have on hand, instead of using it as an excuse to run out and buy something new for my crafting. ;)
I painted the bottoms of my Husband's and son's feet with fabric paint. Then I had them step onto the fabric to transfer their prints. While I held down the top and bottom of the fabric I had them step off the fabric.

This shows the fabric wrong sides together. I wanted to show you how I lined up the feet. Turn the right sides together ( for this you will want to use the right foot print for one and the left footprint for the other so they curve the same way). I tried to line up my son's footprint in the middle of his Dad's footprint. Be careful and not get to close to the instep.

Pin the fabric layers together on with the large footprint facing up. This way when you go to cut around it you can make sure not to cut too closely to the foot.

Leave yourself a generous boarder around the footprint. Try not to indent too much for the instep.


Sew all the way around the foot. Leaving an opening at one end so you can turn it right side out.
For the filling. I used an unscented kitty litter. I thought about using coarsely ground coffee but decided that I wouldn't want coffee in my shoe. I like coffee in my mouth and the smell in my nose but not mixed with feet. ;)

This is a recycled product (no I didn't use it in the litter box first!) It is news paper and is super absorbent and traps odor well (at least in the litter box it does). Still I wanted to add a scent. Peppermint is very invigorating. It is used in those hot/cold packs that are filled with herbs flax seeds and wheat berries. My boys said it smelled like candy canes in the craft room.

I mixed in a few drops into the kitty litter. With essential oils you don't need a lot.

I then put a silica gel packet in the toe area of the pouch and filled my foot with the scented kitty litter.

These don't need to be stuffed full. In fact 3/4 full is plenty. It will make it easier to get them into a shoe since you can shift around the filling.


I hand stitched the opening closed. I also wrote my son's name next to his print with his age and the year.

I also wrote my husbands name, his age and the year around the heal of his print.


This is the card I made up to tie onto the feet when I gift it to my Father-in-law. I came up with my own saying because I couldn't find one to convey the idea of a son and a grandson walking in his footsteps.

I know that sometimes our post get a little long. I hope that you will forgive me because I have a couple other Father's day gift ideas to share with you. Anjeanette and Rebecca did such a great job of making fabulous Father's day gifts. The items I want to share with you can easily be put together in a day or two.

These are Perler Beads. Michael's, a craft store, has mini sets for $1 right now. They come with 225 beads and a pegboard. On the front of the package is a pattern that you can use. I bought them for my boys to do a craft. The kits had more than enough left overs to make a coaster for their dad. If you aren't familiar with these they are beads that you fuse together by placing parchment paper (comes with the kit) over the beads then heat with a iron. Then you flip it over and remove the peg board and heat the other side. This fuses the beads together. For a coaster you simply back it with cork. The nice thing is that you don't have to write backwards because you fuse both sides. This picture is before I fused the beads.
A few years ago I did these paintings for my husband for Father's day. I wrote each boy's name on the back along with the date. On Father's day he got just the two canvas' with the hand prints.
A short time after that I finished the intended project. I purchased canvases in various sizes and depths. I wanted it all to be symmetrical. So the two smaller canvases over and under the hand prints are equal in size to the hand print canvases. I painted them all different colors and edged them in one of the other canvas colors. I wanted this to be very simple. Just the hands on the two canvases with the thought of perhaps adding hand prints over the years to the other canvases. A sort of progression.

I have gotten many complements on this over the years. It is a piece that I am probably most proud of. I certainly cherish it beyond measure. I think I have been trying to capture time with their hand prints. Just a moment of their childhood. Pictures can't really show how big or little they are at the time.

To my Father's, Grandfather's, my Husband and to all the wonderful Dads out there........

Happy Father's day!!!

Katrina

Thursday, June 18, 2009

More Father's Day Ideas

Cups in a chain link fence to spell out a message to your Dad!
Picture messages for Dad!

Every year I make shirts for my kids to wear for Father's Day. Then, I take pictures of them and have them printed and framed for a gift for their Dad for Father's Day.

Rebecca

Magic Card for Father's Day-Gift Card and Book Box

Happy Father's Day, to my Father!
This is my gift to my Dad (Dad, if you're reading this, close your eyes please!) I am so lucky to have my Dad in my life, and thankful to have had him as my Dad. He is such a wonderful man, and I am so proud that he's my Dad! He has the biggest soft spot in his heart for children-all children! He lived his life, working hard, to provide for my family. I am so thankful for the life he was able to provide for our family. He is so talented, in so many ways. He is also a very brilliant man. If I need to know about anything, I just call him up-seriously, any subject! I have learned so much from my Father, and I'm a better person because of him. To say my Dad is a reader is the understatement of the year! His whole house is a library! Every year I always get him a gift card to a book store. I prefer gifts with thought, over gift cards. But for this man, this really is the perfect gift. It doesn't feel right to just give him a gift card. So, here is what I came up with to give the gift card more..."oomph"! I found an awesome box that looks like a book. It was just plain wood and so I painted it up to help it look more like a finished book. Then, I put a card in the box, with a hidden gift card in it!

Hidden Gift Card in the card.
Here is the card with just a drawing of a gift card and not the real card.
The magic in the card is as you pull on the card (on the right side), the actual gift card appears.
Here is the actual gift card with my fake drawing overlay.

How to make the Hidden/Magic picture:
1. Cut out your template. The piece with the cutout window will become the pocket part of the card and the rectangle will become your picture with the overlay.
2. Take your rectangle and make the overlay for it. You slide the rectangle into a sheet protector, pushing it against the fold. Then cut out around the card.
3. Glue the back side of the sheet protector to the backside of the rectangle.
4. Lift up the plastic and make a picture on your paper. I just glued on a die cut. This can be a really neat effect if you use a plain background and then color in lots of detail.

5. Lay the plastic overlay back down, over your picture. Trace the picture with a sharpie.
6. Fold the piece with the cutout window in thirds, with the window on the top. Then, cut the thumb hole out of the other 2 layers of paper.
7. Glue the top of the card to the middle piece, only gluing along the left side and along the bottom, keeping the thumb hole cut out on your right side.
8. Slide your picture with the overlay card into the 3-fold card pocket. Slip the plastic-covered picture over the middle flap. You've done this correctly if the middle flap of the 3-fold card pocket is sandwiched in between the plastic overlay and the picture.
This is how the card looks when it is all in place. You should have lost all the color and extra detail, and should only be left with the outline of your picture.
Here are your 2 finished parts.


Rebecca