OK here is where you start humming the theme song. Cause that is totally what is going through my head right now. ;) So go ahead and take care of that little sound clip for me. ;)
Now that we have the background music taken care of lets get on to party stuff. I did a lot of searching on ye old’ web for ideas. Boy! Did I ever find lots and lots of really cool ideas out there. Some how with all that coolness I managed to put my own twist on things. Seriously you hardly even have to do any of your own planning with how many cool parties there are out there with this theme. I really did want to do each and every single idea and then reality set in. There is no way that I could cram it all into one party. Not even if that party lasted 8 hours. Plus with my boys our parties can’t be too fussy. They don’t do well when we try to micro mange the party. All the transitions from one game or thing to the next causes them to be upset.

Google is a great place to start when looking for Lego Indiana Jones images. All you really have to do is page through the images and find one you like. Copy it and put it into your trusty photo editor, add a background and type up your invitation. I saved it in a small enough file format to be able to email it to all the kids in my son’s class. (His teacher was awesome! At the beginning of the year she gave everyone a complete phone, address and email list of all the kids in the class. It was complete with parents names. She suggested we all get to know each other since our kids would probably be in the same classes through 8th grade.)
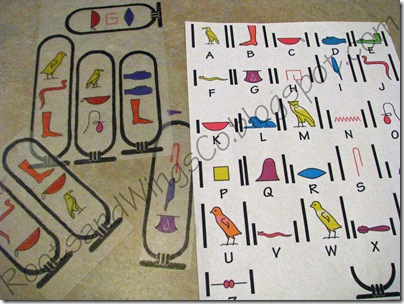
When I throw a party I try to come up with favors that are part of the theme. Often times I will go with something that has a related theme. For example I know that Indiana Jones was an Archeologist. I know that he was some times after Egyptian artifacts. So I went to Google and found
this website that allows you to write in Hieroglyphics. Specifically they put it in cartouche format. I made a key by copying the images of each of the alphabet letter. By the way you can’t do them all at once because the program will condense it down. When writing in hieroglyphics apparently it isn’t one symbol per letter at some point. If you are doing 3 initials it is. So get the initials of all the kids and paste them into your trusty photo editor. I actually made up a sheet with all the symbols stacked for each name. I also reversed the image because I painted the side you draw on with gold. That way the front has a shiny surface. To help me remember which was which, I put the initials on the master copy just below each cartouche. The cartouches on the left are my Shrinky Dinks waiting to be cut out and put into the oven. I used permanent markers to trace and color in the images. I found that coloring in the images before tracing the out line was better. When coloring over the black marker it tends to smear.

This one is my son’s initials. I forgot to punch the holes in the top before I put them in the oven. The one on the left is the back side of his brother’s cartouche. As you can see they don’t all turn out the same size. It all depends on the symbols for each letter.
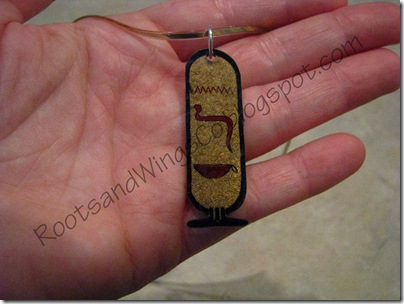
This is one of the finished cartouches for his friends. Since the hole got really small (I used a regular size hole punch), I used a jump ring and put it on some gold boon dongle cord. (I think that is what that stuff is called). I have another observation to share. If you over bake your cartouches a little it gives a slightly crackled look and makes the gold background look more shiny through the cartouche. Also keep some chopsticks or something similar on hand when shrinking these. You may have to open the oven and pry them open. They curl as they shrink and some of them wanted to stick to themselves. This was corrected easily by holding down one side and pulling back with the other chopstick to open it. Then close the oven back up and let them straighten out. I press them down with a flat spatula as soon as I get them out of the oven. This helps to straighten them out a little more. Once they were cool, I painted two coats of acrylic gold metallic paint on the rough side. Once I had the templates made they were pretty quick and easy to trace out.
I had the key (shown in the top picture) out and had each of the kids figure out what the symbols were for their initials. They then had to find the correct cartouche. They loved it. Their parents also thought they were pretty cool too.
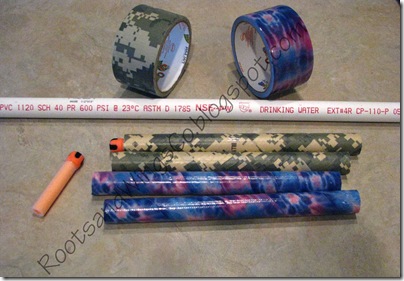
Dig out your memories of Raider’s of the Lost Arch. In the beginning of the movie the Hovitos (sp?) Had poison blow darts that they were chasing Indy with. Many people use straw with q-tips dipped in red paint and shoot them at some sort of picture of one of the villains. I was ready to start working on that idea when I thought of all the extra PVC pipe I had left over from our
Lego Agents Party last January (we made marshmallow shooters). I had a few pieces that were 9” long. I decided to take one of our tag darts and see if I could shoot it out of the pipe. YEP, it worked. Please not that not all 1/2 inch PVC pipe have the same inner diameter. Be sure to take a dart with you to the hardware store to make sure it will fit. I had picked up a few 2 foot pre cut pieces that ended up not working because of that problem. So back to buying a 10 foot length of the stuff I bought in January. Luckily we are only talking about $3 worth. If you look closely at the above picture you can see all the info off the pipe I used. I simply wound the duck tape diagonally around the pipe and trimmed the ends. Another idea to help the kids know whose is whose is to label them with their names. I used my trusty label maker for that. It was kind of hard to see the names at a glance. I would have liked to have had colored electrical tape to make colored bands that the labels could be put on. That way the kids can see what color it is as well as their name. Even the location of the tape could be an indicator.

Time to make some targets. I purchased 5/8 of a yard of red felt and 1/2 a yard of black felt. I also had a smaller piece of red felt for the circles. I cut the red felt into 4 equal rectangles for the background. For the silhouettes I printed out an image of Mola Ram on 13x19 inch paper. I happen to have a printer that large but you can print him out in sections if you don’t. I traced the image onto poster board for my template. I found the image on
www.bricklink.com and went to the mini figure section and then to the Indiana Jones figures and then clicked on Mola Ram (I did the same for all the other characters). I then copied the image and pasted into my Photo Shop program. I made the canvas size 13x19 inches and enlarged the figure as much as I could to fit the whole space. I simply used my poster board cut out as a patter on the black felt. I used no-sew Heat-N-Bond to adhere the silhouette onto the background and did the same with the target spots.
Note: Use a piece of paper between the felt and the iron otherwise the felt will melt onto the iron if you warn not using cotton wool felt.
If you don't know about www.briklink.com it is a website devoted to buying and selling Legos. New and used. When looking for specific items they have a picture of the item and list all of the shops that have that item in order of price. Anyway, if you are looking for figure images it is a good place to go because all the pictures are front and center with the figures standing up. We have shopped there many times for those hard to find items or for even replacement items.
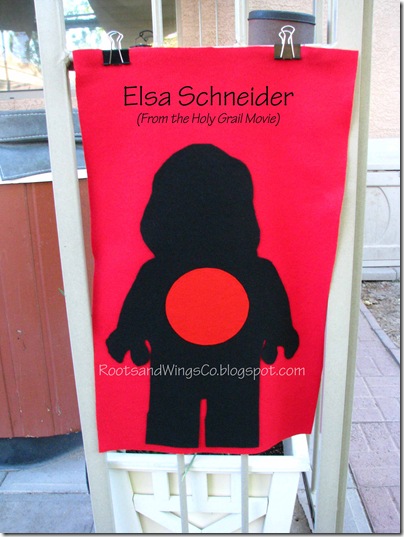
For each of the other figures I simple sized the head to the same proportions. I cropped just the heads from the images and printed them out on standard 8.5x11 inch paper. I cut the head off of my Mola Ram template and taped on the next head. Since all mini figures have the exact same body this works.

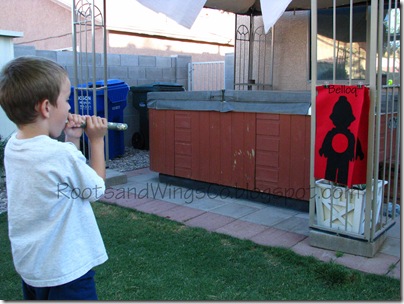
Here is my 6 year old demonstrating how to use these. He is aiming at Belloq. Put the dart in the mouth end of the tube and blow. It does not work so well if you put the dart just inside the other end. It flies straighter and faster if you put it in the mouth end. Our tubes are 9 inches long. We sampled shorter tubes and the darts didn’t fly as far or as straight. I was able to blow the darts out of an 18 inch tube as well. We went with 9 inches because I already had 5 tubes at that length. If you are doing these then buy a 10 foot length and cut it down into 12 inch sections. You will have 10 blow tubes for just over $3. You can use Nerf tag darts that already have the hook side of Velcro on them or you could simply use 3/4 inch pom poms. If you did that then you could probably try making the center circle out of the hook side of velcro for them to stick to. We gave each child a tube and two darts to keep.
The boys got the camouflage “duck” tape and the girls got the tie dye “duck” tape. I purchased the “Duck” tape from my craft store.

I had to do another mini figure cake. I couldn’t do it for one and not the other. You can check out my
Lego Agents Party Post for info on the head and hands. For Indiana Jones I used food coloring to add his beard and eye brows. His whip, bag, gun holster and belt are all made of rolled fondant (like the outer layer of the head and hands). I used some napkins inside a plastic bag to help give his bag some shape.
The frosting is regular white frosting from Wilton. However, I did add some chocolate frosting for the pants. So the top half of the cake is chocolate cake with white frosting and the bottom is chocolate on chocolate. I used Betty Crocker’s gluten free cake mix. If you want to make a 9x13 inch cake with that mix you have to use two boxes or you will end up with pancakes.
By the way our guests didn’t know it was gluten free and they were saying how good the cake was.
Note: I noticed that Wilton’s frosting says it may contain dairy. I am not entirely sure but we think my oldest is reacting to possible trace amounts of dairy. That or he is getting his Dad’s cold. My 6 year old currently has the stomach flu with massive stomach cramps so it is hard to tell.
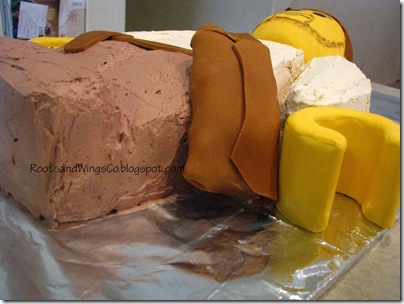
The whip and the bag were made a few days ahead of time so that they could dry out. I added the strap to the bag the day I made the cake. I simply wet one side of the bag so the strap would stick to it.

I used embroidery floss to make the marks in the fondant to make it look braided. For an added touch I tied the floss onto the end and braided it to look like the string on the end of an actual whip. Yep you guessed it I Googled how to braid a whip. I watched a couple of videos on it. It is fascinating to watch. I was going to try to braid the fondant but it likes to dry out quick and cracks when it does. I like how it turned out don’t you?
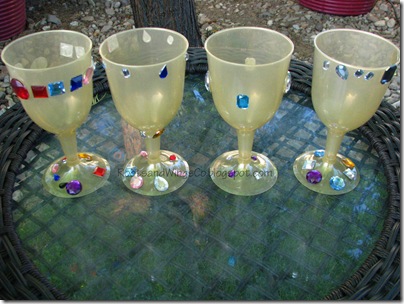
I tried to do a tie in with all of the movies. The kids used sticky dots and gems to make their own “Holy Grail” cups. OK so we all know the real Holy Grail in the movie was as plain as could be but this was more fun for the kids.
My only note about this is that you need a TON of gems. I didn’t have nearly enough. I forgot that 6 and 8 year olds will load up the cups with as many gems as they can get away with. So either have lots and lots and lots and double what you think lots is, of gems or give each child a set amount of gems to work with. I put the gems on the sticky dots ahead of time.

There isn’t a whole lot that I would tie in with the Temple of Doom for 6 year olds but I had to do eyeballs. I had been wanting to make eyeball ice cubes when I found someone that used truffle molds for the shape. I decided to try using their girls marshmallow recipe and it worked great. They were soft and squishy. One mom said that she had to close her eyes before popping one in her mouth. The adults couldn’t resist them. The more adventurous kids also tried them. All in all they were a hit and very yummy. I can see making these every Halloween.
Click here for the recipe and how to make the marshmallows.
To make them into eyeballs you will need:
The recipe from our Marshmallow Post
Truffle molds (like the ones Wilton makes) (
I had two molds and they are only $2 a mold so get as many as you need so you can make all your eyeballs at once. Each mold makes 14 truffles.)
Non-stick spray
A Pastry bag (or plastic bag with a corner cut off)
blue food coloring (the liquid type)
Black gel food coloring (for the pupil)
A Paint brush
Once you have made your marshmallow fluff put it into your pastry bag. Spray the truffle mold to give it a good coating (so the marshmallow won’t stick). Then pipe in the marshmallow into each well. Spray some foil completely with the non-stick spray and cover for a few hours so the marshmallow sets up.
I had a pan ready for the extra marshmallow fluff to make regular marshmallows.
Once your marshmallows have set up and can be handled it is time to “paint” them up. They will be slippery at this point with the non-stick spray. I made mine the day before and the slippery feel to them went mostly away. Anyway. Have a plate ready that is dusted with powdered sugar to keep them from sticking.
Carefully pull all the marshmallows out of the mold with the round side up. Put a bit of blue food coloring in the bottom of a small bowl. You will take an eye ball and dip the top of it in the food coloring. It will have quite a bit on it. You can then “paint” the others by dabbing the first eyeball onto some of the others. When it no longer transfers much color put it down and start with another one. Once you have all your iris’ done you can paint the pupil on with a paint brush. I put mine in the fridge over night loosely covered with foil.
In the above picture you can see that I tried to paint one of the eyeballs with blue gel icing and a paint brush. (it is the one on the right almost in the bottom corner) The others turned out so much better and took the coloring easier.
Other things we did for the party:
We also purchased some dates from the grocery store so that anyone who wanted to could try a date. I was tempted to put a sign out that said “Bad Dates” but figured nobody would try them.
I found some big snakes at the dollar store and hung them from our tree and on the swing set in the back yard. I also purchased sever bags of small snakes and put some around the food on the table and most of them in our sand pit area.
The kids took home the items that I had made for them plus gem lollipop rings, a twisty straw and mini packs of their own water balloons.
We had toilet paper on hand that we were going to do a mummy wrapping contest with. We completely forgot about it since we were all having such a good time.
We also had a water balloon fight since it was 104 degrees out side that day. I have to say that unless you plan to fill water balloons ahead of time I would go with those foam water bombs form the dollar store or water guns or they now have tubes that you can get for a dollar. You put then end of the tube in a bucket of water and pull back on the plunger to fill. They are awesome but don’t last very long (so get extras in case one breaks during water play).
We had a massive water fight on Memorial Day weekend with all the cousins. They all got soaked with those water tubes and had a blast for hours. Plus they got to take them home.
Totally unrelated to the IJ party but I have to share this. I found this
set of plans on Instructables for making water cannons out of PVC. They would be fun for the kids to put together and then play with and last way longer then the ones I got at the dollar store. The website makes them out of 2 inch and 1 inch PVC but you could easily use 1 inch and 1/2 inch PVC for smaller kids. They would be very cheap to make up using the 1 and 1/2 inch pipe sizes. I can totally see making these for a party. It is a good thing I didn’t see this before the party or I would have had to make them. ;) My darling husband smiles and goes along with all my crazy schemes.
You survived my extremely long post!!
Thanks for hanging in there with me!
Katrina
Technorati Tags:
Lego,
Indiana Jones,
party,
marshmallow,
eyeballs,
food,
party favors,
cake
We are joining the fun at the following parties;
Tatertots and Jello,
Funky Junk Interiors,
Stephanie Lynn,




 Posts
Posts